Create an Announcement
You can create announcements in the agent interface. From the announcement form, you can also add any necessary translations. If applicable templates are available in the system, you can use them to create announcements.
You can also add the feedback widget on an announcement's portal form. The answers and comments left by users are stored in the Announcement Feedback (announcement_feedback) table.
Roles required: announcement_manager or admin.
To create an announcement, complete the steps below:
-
Navigate to Service Announcements → New Announcement.
-
(optional) Click Create from template to select an appropriate template and fill in the announcement form with its values.
-
Fill in the fields or edit the values as needed if the announcement was created from a template.
tipThe attachments added to the record will be available for download on the announcement page in the self-service portal.
-
Add announcement content, its translations, and relevant signatures in the Announcement body.
-
Click Save or Save and exit to apply the changes. The record will be saved in the Draft state.
-
(optional) If the workflow implies a mandatory approval, change the announcement state to Review and wait until it is completed.
-
Select the via Portal checkbox to only publish the announcement on the portal.
-
(optional) Select the via Email checkbox to send the announcement by email to all stated recipients.
-
Select the Published state and click Save or Save and exit to publish the article in the self-service portal and email it if the via Email checkbox has been selected.
Before you save an announcement in the Published state, ensure the via Email checkbox value is the one you need.
- You will not be able to stop the sending of emails after the record is saved in the Published state for the first time.
- An announcement is emailed only once – after the announcement record is saved in the Published state for the first time. If you save the record in the Published state with the checkbox cleared (the announcement is not emailed), the announcement will not be sent later if you select the checkbox and save the form again.
Announcement form fields
| Field | Mandatory | Description |
|---|---|---|
| Number | Y | The announcement number. This field is populated automatically and has the ANCMXXXXXXX format. It is always read-only. |
| Task | N | Specify the task related to the announcement. |
| Recipient emails | N | Specify the emails of the recipients of the announcement. You can enter multiple emails separated by commas. |
| Reviewer emails | N | Specify the emails of the reviewers of the announcement. You can enter multiple emails separated by commas. |
| Description | N | Add a short announcement description. It is not shown to the users of the service portal. |
| State | Y | The announcement state. Available options:
Only active announcements {state IS Published via AND Portal IS Yes} are displayed to the portal users. |
| Type | Y | Select the announcement type. Available options:
|
| Service | Y | Specify the related IT service. |
| via Email | N | Select this checkbox to send this announcement via email. It will be sent to all addresses specified in the Recipient emails field. |
| via Portal | N | Select this checkbox to display this announcement on the Self-Service Portal in the Portal Announcements area. |
| Enable feedback | N | Select this checkbox to add the feedback widget on the announcement's portal form. The checkbox is displayed only if the via Portal checkbox is selected. If the checkbox is selected, the announcement body widget shows the Feedback question and Feedback answer options fields. Fill them in for the feedback widget to function. |
| Access criteria | N | Specify the criteria determining the availability of the announcement to users on the specified Portals. If no criterion is specified, the announcement will be available to all authorized users. If a specified criterion is deactivated, it will still apply to the announcements it is related to provided that these announcements are already published. However, this criterion cannot be specified for new announcements. If a specified criterion is deleted, all the published announcements it is related to are hidden from the specified Portals. The field is displayed if the via Portal checkbox is selected. |
| Portals | N | Specify the portals the announcement is to be displayed on according to the specified Access criteria. If the field is empty, the announcement is displayed on all the portals existing in the system. The field is displayed if the via Portal checkbox is selected. |
| Resend | No | Select this checkbox to resend the notification at the time specified in the Resend date and time field. Resending occurs when the following conditions are met:
|
| Resend date and time | No | Select the resend time. This field is available if the Resend checkbox is selected. |
Announcement body widget
Use the widget to create announcement content and add its translations into different languages.
- The language used for sending announcements and displaying them on the portal is the same and is defined in the announcement.language.source system property.
- If the Type field of an announcement does not have a translation into the required language, its English value is used.
To add an announcement content, complete the fields in the Announcement body widget.
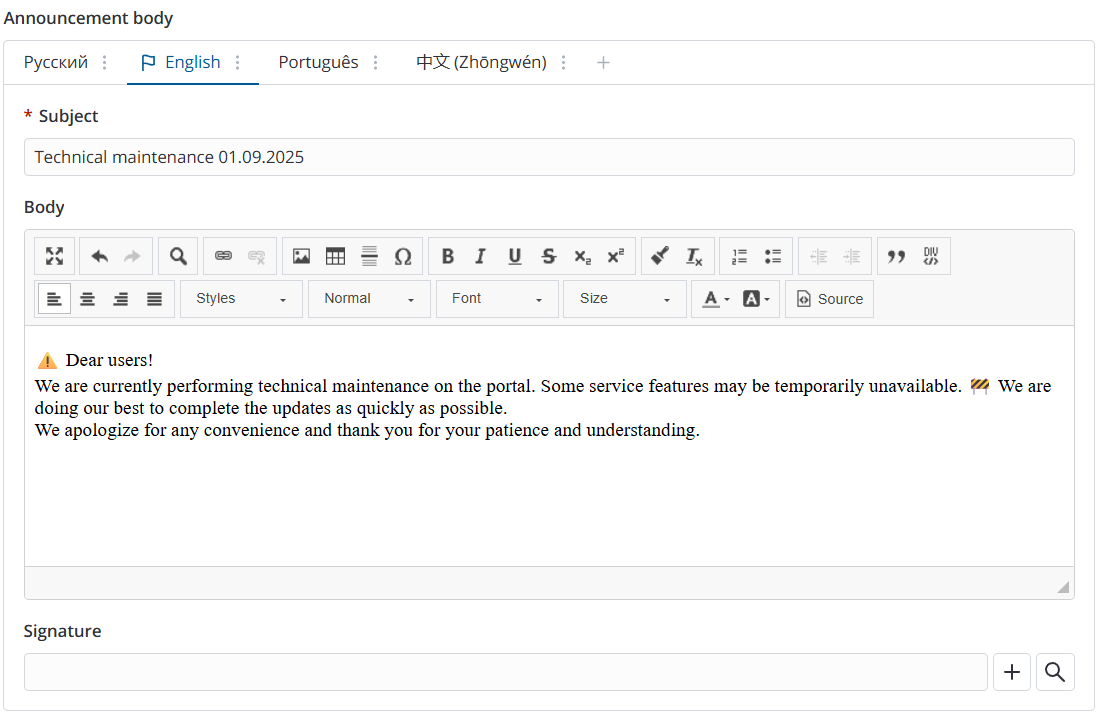
In the initial state, the widget contains a tab for the announcement text in the language specified in your user profile. The language name appears on the tab label.
You can specify a default language for the current announcement. This version is shown to users without a system account and to those whose interface or notification settings do not match any available translation. The default translation is marked with the
Each tab includes a
| UI action | Description |
|---|---|
| Add translation | Select to add a translation to another language. You can select any language from the Language (sys_language) table. |
| Change language | Select to change the translation language. Note that changing the language in the tab settings does not automatically translate its content. |
| Use by default | Select to use the announcement in this language as the default. For more information, see Default language. |
| Open in new tab | Select to open the translation record from the Announcement Localization (announcement_localization) table in a new tab. |
| Move right | Select to move the tab to the right within the widget. |
| Move left | Select to move the tab to the left within the widget. |
| Delete | Select to delete the announcement translation record. |
Announcement text widget fields
| Field | Mandatory | Description |
|---|---|---|
| Subject | Y | Enter the subject of the announcement. |
| Body | N | Enter the text of the announcement. Use the built-in editor to format the announcement body (including tables, media, lists, styles, and headings). |
| Signature | N | Add the text that will appear in the announcement signature. For more information, see Create announcement signature. |
| Feedback question | Y | Specify the question to be displayed in the feedback widget on the announcement's portal form. If the announcement is available in several languages, ensure that the question has a translation for each. The field is displayed if the Enable feedback checkbox is selected. |
| Feedback answer options | Y | Add the answer options for the announcement feedback. We recommend that you add no more than five options for users' convenience. When adding and changing the answer options, ensure that they are translated to all the languages the announcement is available in. The field is displayed if the Enable feedback checkbox is selected. |
Default language
If no translation records have been created yet, the language used in the original announcement is considered the default one. When you create translations, you can specify which one should be used as the default one.
The announcement in the default language will be sent to users by email and displayed on the portal if:
- the recipient specified in the mailing list does not have a user account in the system.
- the system does not contain a translation of the announcement in the language specified in the user’s Interface language or Notification language fields in their preference settings. The mailing language is determined in the announcement.language.source system property.
Announcement feedback
You can configure adding feedback on portal announcements. To do so, navigate to an announcement in the agent interface and select the via Portal and Enable feedback checkboxes on its form. Then, specify the Feedback question and Feedback answer options to be displayed in the announcement.
The feedback questions and answer options are also configurable. It is advised to semantically connect the question and answer options. For example, the "Was the article helpful" question can have the "Yes" and "No" answers. If the question is "Rate the article", the answer options can be numeric.
When submitting feedback, a user can not only choose an answer option but also leave a comment.
Feedback questions
To add a feedback question:
- Navigate to Announcements → Feedback Questions.
- Click New.
- Add the question to the Name field.
- Click Save or Save and exit.
After creating a question, add its translations via the Translations related list if needed.
After adding a question to an announcement, the latter will be displayed in the Announcements related list on the question form. The list also allows you to create an announcement. In this case, the Feedback question field on the new announcement's form will be populated automatically. To complete feedback configuration, you will only need to select the via Portal and Enable feedback checkboxes on the announcement form and specify the answer options.
To make a question unavailable for feedback configuration, clear the Active checkbox on its form.
The out-of-the-box version includes the Was this announcement helpful? question with a range of answer options.
Feedback answer options
To add a feedback answer option for a question:
- Navigate to the Answer Options related list on the question's form. You can also navigate to Announcements → Feedback Answer Options.
- Click New.
- Fill in the form fields.
- Click Save or Save and exit.
Feedback Answer Option form fields
| Field | Mandatory | Description |
|---|---|---|
| Feedback question | Y | Specify the feedback question this answer option applies to. When creating an answer option via a question's form, this field is populated automatically. |
| Name | Y | Specify the feedback answer option. |
| Order | Y | Set a unique order for the answer option. The lower the value, the closer to the beginning the option is displayed in the list. This field is filled in automatically: the Order of a new answer option is 10 points greater than the maximum Order among all the active answer options existing for the specified question. If the question does not have any answer options yet, the new option is set the order 10. |
After creating an answer option, add its translations via the Translations related list if needed.
To make an answer option unavailable for feedback configuration, clear the Active checkbox on its form.
Feedback records list
The Announcement Feedback (announcement_feedback) table stores the feedback answers and comments users leave on announcements. Each record contains the following information:
- the name of the user who provided the answer and comment,
- the feedback answer given,
- the comment left,
- a link to the announcement.
If the user chooses another feedback option, the corresponding Announcement Feedback (announcement_feedback) record is updated.