Approval Form
The Approval Form widget is intended for portal and agent interface users who are to follow the approval procedure for business processes registered in the system. The widget contains the basic information about the approval ticket, lists the mandatory and non-mandatory approvers and their decisions, if any.
Once the approval procedure is completed, the object of approval enters the Approved state or any other state depending on the decision and the state model of a given entity.
Find more information on the approval mechanism configuration in the Approvals article.
The following users can view approval tickets:
- approvers,
- users with the admin or approval_admin roles,
- the user who initiated the approval – either the creator of the approval ticket, or the user specified in the Responsible field in the related record that requires approval.
- users with the fallback_approver role can decide on behalf of an approver. In this case, they must explain their decision in a comment.
Non-mandatory approvers can only reject the approval ticket.
Widget configuration
You can determine where the widget must be available – on the portal, or in the agent interface only. You can also configure the following elements:
- Condition for approval and rejection. Approvers can evaluate the influence their decision will make on the final result.
- Approvers lists. Display one list for all approvers or divide it into two groups – mandatory and non-mandatory approvers.
- Display of the decisions made by the other approvers.
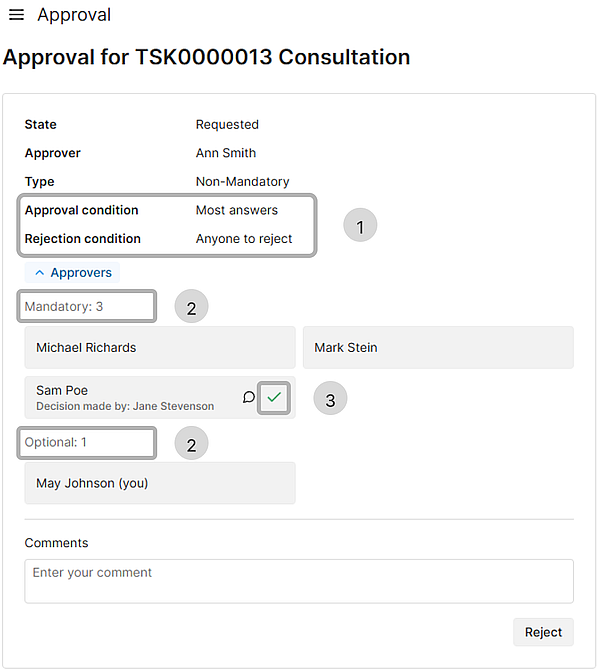
Available options:
| Name | Type | Mandatory | Description | Default value |
|---|---|---|---|---|
| isPortal | Boolean | N | Set the value to true to display the widget on the portal. If no value is set, the widget behaves as if false is specified. | true |
| hideApprovalCondition | Boolean | N | Set the value to true to hide the conditions for approval and rejection. | false |
| hideApproversDecisions | Boolean | N | Set the value to true to hide the icons referring to the decisions made by other approvers. | false |
| hideApproversMandatoryLabel | Boolean | N | Set the value to false to display two lists of approvers: mandatory and non-mandatory. | false |
{
    "hideApprovalCondition": false,
    "hideApproversDecisions": false,
    "hideApproversMandatoryLabel": false
}
Displaying the widget on the portal
By default, the Approval Form widget is available on the portal in the Approvals section. You can also see it in the My Work → Approval Tasks section of the agent interface.
To display the widget on any other portal page, create a new widget instance and locate it there.
Displaying the widget in the agent interface
To configure the widget option schema, follow the steps below:
- In the table that must contain the widget, open a record.
- In the burger menu , select Configure → Form → Layout.
- In the Selected box, find the widget and click the gear icon next to the widget title.
- In the Configure the value of the widget options modal window that appears, specify the widget parameters in JSON format and click Save.
- Click Save to apply the changes of the form layout.