Recruitment Funnel
The recruitment funnel allows you to automate the applicant selection process and customize the stages of this process based on your company's requirements for a particular position. Main information about the funnels registered in the system is stored in the Funnels table (hrm_funnel).
Role required: hrm_agent.
Create a funnel
If you create a Job Post or start work on an Applicant Submission task whose job categories do not have a funnel, the funnel will be created automatically.
The job category title will be used as the funnel title, and the funnel stages will be copied from the default funnel.
To create a recruitment funnel, complete the following steps:
- In the agent interface, navigate to Human Resource Management (HRM) → Recruitment → Funnels.
- Click New in the upper-left corner of the page.
- Fill in the required fields in the modal window that opens and click Create.
- Click Save or Save and exit to apply the changes.
Funnel form fields
| Field | Mandatory | Description |
|---|---|---|
| Title | Y | Specify a recruitment funnel title. |
| Job category | Y | Specify the category the job title belongs to. You can select only active job categories that do not have a funnel. |
Funnel stages
Main information about the funnel stages registered in the system is stored in the Funnel Stages table (hrm_funnel_stage).
The funnel form contains a Stages widget. Applicants must complete all stages to join your company.
The funnel record located at \{your instance URL}/record/hrm_funnel/172061997515011298 is a default read-only funnel. This default funnel sets the following standard funnel stages for all newly created records:
- Review
- Interview
- Job offer
- Hiring
Funnel stage states
| Stage | Description |
|---|---|
| Pending | The applicant has not yet been moved to this stage. |
| In progress | The applicant is currently at this stage. |
| Passed | The applicant passed the stage. |
| Rejected | The applicant failed to pass the stage and was rejected. |
| Skipped | The applicant skipped the stage because it was inserted to precede a later stage that the applicant already reached at the moment of insertion. |
Create a funnel stage
To create a recruitment funnel stage, complete the following steps:
- In the agent interface, navigate to Human Resource Management (HRM) → Registers → Funnels and open the required funnel record.
- Click Add stage at the bottom of the Stages widget.
- Fill in the required fields in the modal window that opens and click Save.
Funnel stage fields
| Field | Mandatory | Description |
|---|---|---|
| Title | Y | Specify a stage title. |
| Time limit | N | Specify a time limit for the applicant to complete this stage. If the limit is exceeded, the stage is considered overdue. |
| Color | Y | Specify a color for the stage in the HEX format, for example, #ffffff. |
| Color picker | N | The field displays the current color of the stage. Click the color picker to open the palette and select one of the available colors. |
| Order | Y | Specify the order of the created stage. It must not exceed the order of the last default stage. Order numbers of standard stages are multiples of 100 and cannot be edited. Order numbers of custom stages must differ from standard stage numbers and can only be edited before an applicant submission task enters the current funnel. |
| Job offer required | N | Select the checkbox if this stage requires an applicant to accept a job offer related to the applicant submission task. The stage will be marked with a briefcase icon . |
A funnel can have only one stage with the Job offer required checkbox selected, other stages will have the checkbox cleared automatically.
Edit a funnel stage
To edit a recruitment funnel stage, complete the following steps.
- In the agent interface, navigate to Human Resource Management (HRM) → Registers → Funnels and open the required record.
- Click the title of the required stage in the Stages widget.
- Edit the required fields in the modal window that opens and click Save.
Delete a funnel stage
You can delete funnel stages only until applicants start entering the funnels as part of corresponding tasks. To delete a funnel stage, complete the following steps:
- In the agent interface, navigate to Human Resource Management (HRM) → Registers → Funnels and open the required funnel record.
- In the Stages widget, click the title of the stage that you previously added.
- Click Delete in the modal window that opens.
Connection with Stages widget
The Connection with Stages widget is available on the Job Posts forms in the agent interface and on the portal.
- To view the widget on the portal, navigate to Main page → Activities → HR tasks and open the required record.
- To view the widget in the agent interface, navigate to the Job post list and open the required record.
The widget is also available in the Applicant Submission tasks on the portal and in the agent interface.
- To view the widget on the portal, navigate to Main page → My tasks and open the required applicant submission record.
- To view the widget in the agent interface, navigate to Human Resource Management (HRM) → Recruitment → Applicant Submissions and open the required applicant submission record.
Widget elements on the Job Post form
- Total number of applicants at all stages.
- The number of applicants at a given stage.
- The number of applicants eliminated at this stage – .
- The button to go to the selection funnel – .
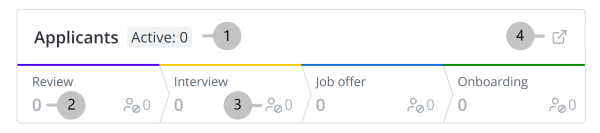
To see a list of all applicants at a given stage, click the stage.
Widget elements on the Applicant Submission form
- – the applicant has passed the stage.
- – the applicant is currently at this stage.
- – the applicant was eliminated at this stage.
- – the stage is locked until the applicant passes the previous stage.

To view information about a stage, click the stage.
Stage Information modal window fields
| Field | Description |
|---|---|
| State | The field displays the stage state. Possible values:
|
| Stage duration | The period of time that passed from the moment the applicant was transferred to the stage until the moment the stage was completed. |
| Stage start date | Date and time when the applicant started the stage. |
| Stage end date | Date and time when the applicant passed the stage or was eliminated. |
Move an applicant to the next stage
To move an applicant to the next stage, complete the following steps:
- In the agent interface, navigate to Human Resource Management (HRM) → Recruitment → Applicant Submissions and open the required record.
- Then do one of the following:
- Click Move to the next stage in the upper-right corner of the widget and click Confirm in the modal window that opens.
- Click the current stage and then Move to the next stage in the modal window that opens.
- Click the next stage and then Move to the next stage in the modal window that opens.