Process Incidents
Role required: incident_manager.
This section focuses on how incidents are processed by agents.
Assign incidents
Once the incident is registered, it should be assigned to a responsible person or group for further processing. To assign an incident, complete the following steps:
- Navigate to Incident Management → All Incidents and open the incident you need to assign.
- Specify a user in the Assigned user field or select a group in the Assignment group field. If one of these fields is completed, the other becomes non-mandatory.
When the incident moves into the In progress state, the Assigned user field becomes mandatory.
Alternatively, simply click the Assign to me or Start work button to assign the incident to the current user. You can also Reassign the incident.
Display conditions for buttons
Each button is displayed only if all the specified conditions are met.
| Button | Display conditions |
|---|---|
| Assign to me |
|
| Start work |
|
| Reassign |
|
You can also assign multiple incidents at once.
The Assign to me and Reassign buttons move the incident into the Assigned state, while the Start work button changes the state to In progress.
Whereas the Assigned to field is completed with the name of the current user, the Assignment group field is completed depending on the following conditions:
- If the Primary group (primary_group) field on the current user's page is completed, then an empty Assignment group field on the incident form is completed with the primary group value.
- If the Primary group field on the current user's page is completed, but the Assignment group field on the incident form is filled with a different value, then the Assignment group is completed with the primary group value.
- If the Primary group field is empty, but the Assignment group is completed with a group to which the user belongs, then the Assignment group field keeps its value.
- If the Primary group field is empty, but the Assignment group is completed with a group to which the current user does not belong, then the Assignment group is cleared.
If the Assignment group field is updated when the Assigned user field is empty, then the system sends a notification to the members of the assigned group.
Assign multiple incidents
You can assign multiple incidents at once.
The maximum assignable number is specified in the itsm.mass_processing.max_number_to_assign property. If you exceed this limit, an error will be displayed, and the action will not be initiated.
To assign multiple incidents, follow these steps:
-
Navigate to Incident Management → All Incidents.
-
In the list, select the checkboxes next to the incidents you need to assign.
-
Click Assign in the upper-right corner of the page.
-
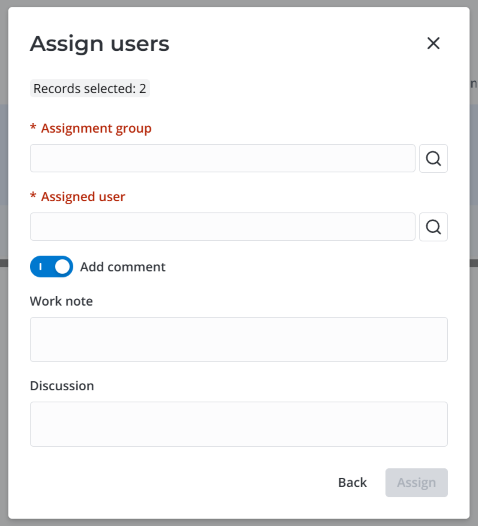
In the modal window that opens, select the Assignment group or Assigned user. You can search for them in the dictionary opened by clicking the magnifier icon .
noteYou can assign incidents:
- to both a group and a user belonging to this group.
- to a group without specifying a user.
- to a user without specifying a group. In this case, if the Assigned user has a primary group, it is automatically added to the Assignment group field. You can change this group manually if needed.
-
If needed, activate the Add comment toggle to leave comments in the Work note and Discussion fields that appear.
noteComments from the Discussion field in the modal window are not passed to infrastructure incidents as they do not have this field on their form. This is because Discussion is designed for communicating with the portal users, while infrastructure incidents are created by agents or the monitoring system. To communicate with the agents working on the incidents, use the Work note field.
-
Click Assign to apply the changes.
After that, the values that you specified in the modal window are automatically added to the corresponding fields of the incident forms. The assigned incidents' state changes to Assigned.
Update incidents
To make any updates to the incident, complete the following steps:
- Open an incident to work on.
- Change the necessary fields.
- Click Save or Save and exit to apply the changes.
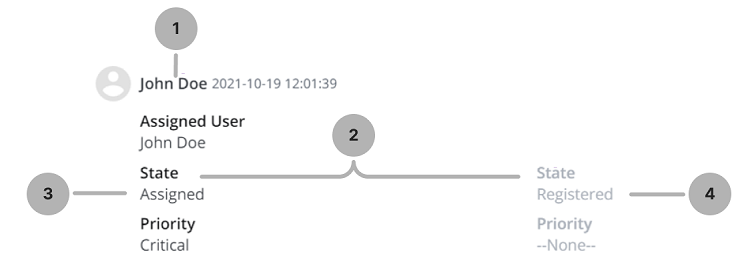
Your changes will be displayed in the Activity Feed, in history.
The following information is displayed:
- Who initiated the update
- Updated field
- New field value
- Previous field value
For child incidents, some fields can only be edited by the users with the admin role. They are automatically filled in with the information from the parent incident.
Activity view
Escalation rules
There are two possible types of escalation:
- Functional. When the 1st level service desk agents cannot solve an incident for some reason (lack of authority or competence), they escalate it to the 2nd level service desk agents.
- Hierarchical. This escalation is typically required when an incident is of a serious nature, or a set of incidents may take a lot of time. An issue can be escalated up to the management.
Reclassify an incident as a service request
Role required: itsm_agent or admin.
If an incident is not an infrastructure incident and its state is not Closed, you can reclassify it as a service request. For example, if the caller selected a wrong request type.
To reclassify an incident as a service request, follow these steps:
-
Navigate to Incident Management → All Incidents.
-
Open the incident you need to reclassify. Ensure that this incident is not an infrastructure incident and that its state is not Closed.
-
Click Service Request in the upper-right corner of the page.
-
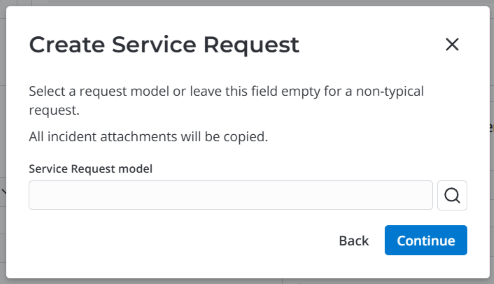
In the modal window that opens, select the Service Request model and click Continue. You can continue without selecting the model if you need to create a non-typical request.
-
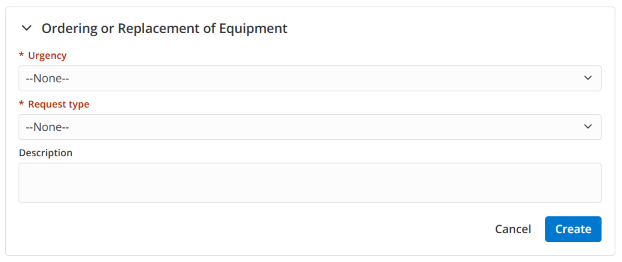
If you selected the service request model, this model's widget appears on the incident form. Fill in the required fields and click Create. This opens the created request. It is prefilled with the information from the incident in the fields listed below.
Service request fields prefilled with information from the incident
On the General tab:
- Impact
- Urgency
- Assignment group
- Assigned user
- Subject
- Description
- Related CIs
- Caller
- Company
- Service
- Service consumer
- Caller is consumer
- Attention required
- Followers list
- Contact type
On the Related Records tab:
- Related articles
- Solved by changes
-
If you did not select the service request model, clicking Continue in the modal window opens the service request creation form. It is prefilled with the information from the incident in the fields listed above. You can change this information if needed. Click Save or Save and exit to apply the changes.
The service request is created in the Registered state. It is marked as Created from Incident. It has all the attachments from the reclassified incident.
After you create the request, the state of the incident changes to Completed with Not solved (created by mistake) as its Closure code. The Closure notes field displays a comment about the creation of the request. If the incident was a child incident, it is detached from the parent.
If the incident is reclassified with an empty Assigned user field, after saving the service request form this incident field will be completed with the user who performed the reclassification:
- If this user belongs to the specified Assignment group, its value will not change.
- If this user does not belong to the specified group, the Assignment group field value will change to the Primary group of the user.
- If the user does not have a Primary group, the Assignment group field will be cleared.
The service request and the incident it was created from are linked to each other:
- On the service request form, the Related Incident field on the Related Records tab displays a reference to the incident.
- On the incident form, the Related Service Request field on the Related Records tab displays a reference to the service request.
The selected service request model is displayed in the Related request model field on the request form. You cannot change the selected model.
The caller is sent an email notification about the reclassification of the incident as a service request. The notification contains links to the portal views of both the incident and created service request.
Incidents can also be created from service requests. You can find these incidents in the Incident (itsm_incident) table by adding the Created from Service Request column to the list interface. This information is also displayed in an incident's History.
Complete incidents
Closure information
When an incident is resolved, it should be marked as Completed. This causes the Closure information tab to appear on the incident form. The agent must provide the following details:
The agent may also leave some Notes for agents.
Closure code
This code specifies an option for the closure.
| Option | Description |
|---|---|
| Solved 1st level | Service desk agents of the 1st level solved the incident without functional escalation. |
| Solved 2nd level | Service desk agents of the 2nd level solved the incident (service desk agents of the 1st level were unable to solve it). |
| Not solved (Cannot be reproduced) | Agents could not reproduce the incident and did not find any disfunction. |
| Not solved (Created by mistake) | When the request is not an incident but, for example, a change request. |
| Not solved (No user response) | When a user did not provide additional information during the Information needed phase. |
| Not solved (Other) | For all other reasons. |
| Not solved (Workaround) | The incident has no permanent solution, but has a temporary workaround related to a known error. |
| Not solved (Canceled by user) | The caller or their manager canceled the incident. |
Closure Notes
In the Closure notes field, add information on the work performed, and other information related to this incident. This information will be available to the Caller.
You can add a quick response via the Quick Responses widget by clicking the icon.
Notes for agents
In the Notes for agents field, add the information on the incident that is intended for the agents working on it. This field can be viewed and edited by the users with the ITSM_agent or admin role.
You can add a quick response via the Quick Responses widget by clicking the icon.
Complete incidents as originators
An incident can be the originator of other entities:
- Incident → problem;
- Incident → change request;
- Incident → problem → change request.
This relationship is set by creating records via an incident's burger menu . You can also add the corresponding problem and change request to the Related problems and Solved by changes incident fields respectively, or add the incident to the Related incidents field of the problem or the Caused by incidents field of the change request.
If a corresponding problem or change request is completed with the Complete originators checkbox selected, this incident is also completed.
When completing an incident from a problem:
- Its Closure code and Closure notes will change to these fields' values from the problem.
- If the incident's Assigned user field is empty, it is completed with the user assigned to the problem. If this user does not belong to the incident's Assignment group, this field's value changes to the Primary group of the user. If the user does not have a Primary group, the incident's Assignment group field is cleared.
When completing an incident from a change request, it is assigned the Solved 2nd level closure code. Its Closure notes is populated with this field's value from the change request.
If the incident already is in the Completed or Closed state, these fields' values do not change.
Complete multiple incidents
You can complete multiple incident tickets at once.
Mass completion from the list view is available for all incident types except for major incidents. You can only complete major incidents via their respective forms. Note that in addition to the Closure code and Closure notes, you need to specify a major incident's Chronology to complete it.
The maximum number of tickets that can be completed at once is specified in the itsm.mass_processing.max_number_to_complete property. If you exceed this limit, an error will be displayed, and the action will not be initiated.
To complete multiple incident tickets, follow these steps:
-
Navigate to Incident Management → All Incidents.
-
In the list, select the checkboxes next to the incident tickets you need to complete.
-
Click Complete in the upper-right corner of the page.
-
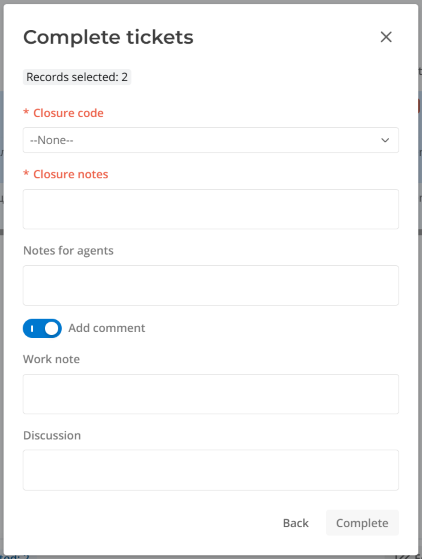
In the modal window that opens, specify the Closure code and fill in the Closure notes. You can also leave some Notes for agents.
-
If needed, activate the Add comment toggle to leave comments in the Work note and Discussion fields that appear.
noteComments from the Discussion field in the modal window are not passed to infrastructure incidents as they do not have this field on their form. This is because Discussion is designed for communicating with the portal users, while infrastructure incidents are created by agents or the monitoring system. To communicate with the agents working on the incidents, use the Work note field.
-
Click Complete to apply the changes.
After that, the values you specified in the modal window are automatically added to the corresponding fields of the incident forms. The incidents' state changes to Completed.
When completing multiple incidents at once, if their Assigned user field is empty, it is filled in with the user performing the completion.
If this user belongs to the Assignment group specified in the incidents, this field's value does not change. If this user does not belong to the specified group, the Assignment group field value changes to the Primary group of the user. If the user does not have a Primary group, the Assignment group field is cleared.
Complete incidents automatically
Infrastructure incidents are not completed automatically as their state model does not have the Information needed state.
If an incident is in the Information needed state, and the caller does not respond within the specified time frame, the incident is automatically moved to the Completed state:
- Not solved (No user response) is selected as the Closure code.
- A comment about the lack of response from the caller is added to the Closure notes.
The caller is notified that the work on their ticket has been completed.
You can specify the number of days after which incidents with no caller response are automatically completed in the system property itsm.itsm_incident.days_count_to_completed. The itsm.itsm_incident.schedule_id_state_to_completed property allows you to specify the schedule used for calculating the period until the automatic completion.
Close incidents automatically
Infrastructure incidents can only be closed manually via their forms.
Completed incident tickets are automatically moved to the Closed state if the caller provides no feedback within the specified time frame. The automatically closed incident tickets also get deactivated.
You can specify the number of days after which completed incidents with no caller feedback are automatically closed in the system property itsm.itsm_incident.days_count_to_solution_accept. The itsm.itsm_incident.schedule_id_to_solution_accept property allows you to specify the schedule used for calculating the period until the automatic closure.
Comment on multiple incidents
You can add a comment on multiple incidents at once.
The maximum number of incidents that can be commented on at once is specified in the itsm.mass_processing.max_number_to_comment property. If you exceed this limit, an error will be displayed, and the action will not be initiated.
To add a comment on multiple incidents at once, complete the following steps:
-
Navigate to Incident Management → All Incidents.
-
In the list, select the checkboxes next to the incidents you need to comment on.
-
Click Add comment in the upper-right corner of the page.
-
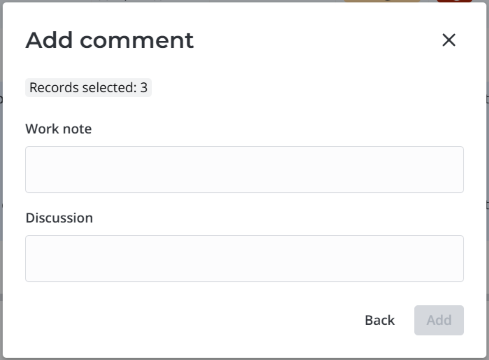
In the modal window that opens, fill in the Work note and Discussion fields.
 note
noteComments from the Discussion field in the modal window are not passed to infrastructure incidents as they do not have this field on their form. This is because Discussion is designed for communicating with the portal users, while infrastructure incidents are created by agents or the monitoring system. To communicate with the agents working on the incidents, use the Work note field.
-
Click Add to apply the changes.
The comments you entered in the Work note and Discussion modal window fields will be automatically added to the Work notes and Discussion of the selected incidents.
Cancel and resume incident tickets
The callers and their managers can cancel and resume their incident tickets on the Self-Service Portal. To enable this, the itsm.ticket_cancel_resume.portal.is_enabled system property must be set to true.
The canceled incident moves to the Completed state with the Not solved (Canceled by user) closure code. If the cancellation reason was provided, it is added to the Discussion in the Activity Feed. The user or group assigned to the incident is notified about its cancellation by email.
The caller or their manager can resume their canceled incident only if it is in the Completed state with the Not solved (Canceled by user) closure code. The resumed incident moves to the Assigned state. If the resumption reason was provided, it is added to the Discussion in the Activity Feed. The user or group assigned to the incident is notified about its resumption by email.