State Flow Designer
The State Flow Designer allows you to customize the transitions between the states. As an example, see the incident state models.
To configure transitions for a specific practice, create a state model first, and then configure transitions.
Role required: admin.
Create a state model
The state models are stored in the State Model (sys_state_model) table. To create a state model, complete the following steps:
- Navigate to State Flow Designer → State Models.
- Click New and fill in the fields.
- Click Save or Save and exit to apply the changes.
State model form fields
| Field | Mandatory | Description |
|---|---|---|
| Name | Y | Specify a model name. |
| State flow script | N | The client script that specifies the transition logic. The field appears after the record is saved. It is populated automatically when the transitions are set. |
| Table | Y | Select a table to create the model. You can only select tables that have a column with the Column name is state. |
| Active | N | Select this checkbox to activate this state model. |
| Inherited | N | Select this checkbox to enable inheritance of the state model to child tables. |
| Condition | N | Specify the conditions that must be met to enable the state model transitions. See the Condition Operators article to learn more about available condition operators for different field types. An empty condition always returns true. |
| Description | N | Add a brief description of the state model. |
Configure the transitions
The transitions are stored in the State Transition (sys_state_transition) table. To configure transitions in a created state model, complete the following steps:
- Navigate to State Flow Designer → State Models.
- Open the state model record you need to modify.
- In the Related Lists area, select the State Transition tab.
- Click New and fill in the fields.
- Click Save or Save and exit to apply the changes.
Another way to create a new transition is as follows:
- Navigate to State Flow Designer → State Transition.
- Click New and fill in the fields.
- Click Save or Save and exit to apply the changes.
In this case, fill the State model field manually.
State Transitions form fields
| Field | Mandatory | Description |
|---|---|---|
| State model | Y | Specify the state model for which the transition is created. |
| State | Y | Specify the initial state for the subsequent transitions. You can only specify fields of the model table. The table should have a column with the Column name is state. |
| Available transitions | N | Select the transitions available for the state specified in the State field. You can select only fields of the model table. The table should have a column with the Column name is state. Define the states which activate or deactivate the target record. The outcome is defined by the Record activity field. |
| Description | N | Add a brief description of the transition. |
| Autotransition | N | Select this checkbox to enable the scheduled automatic state change for the state specified in the State field. |
| Auto state | N | Specify the state the record automatically transitions to. You can only specify fields of the model table. The table should have a column with the Column name is state. This field appears when the Autotransition checkbox is selected. |
| Duration | N | Specify the duration (by business time, days, hours, and other), after which the state is automatically changed. This field appears when the Autotransition checkbox is selected. |
| Schedule | N | Specify a schedule to calculate the autotransition date. This field appears when the Autotransition checkbox is selected. |
| Record activity | N | The Record activity field appears if the table defined in the related State Model has the Active column. Define if the Active column in the target record will change. The checkbox is selected or cleared when the State of the target record has a value defined in the Available transitions field. Available options:
|
Example of the configured transitions
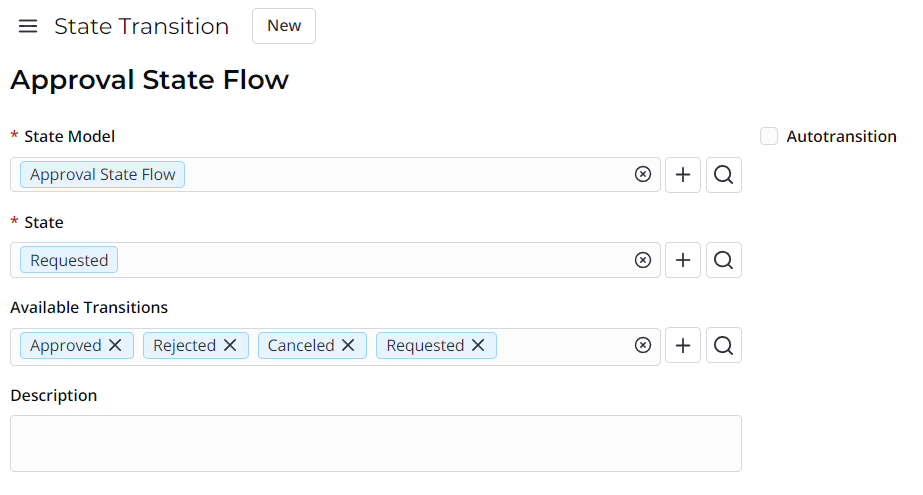
There is the Approval state flow model for the Approval table that contains the following transition:

In this screenshot, the Requested state can change to Approved, Rejected, Canceled states or stay Requested.
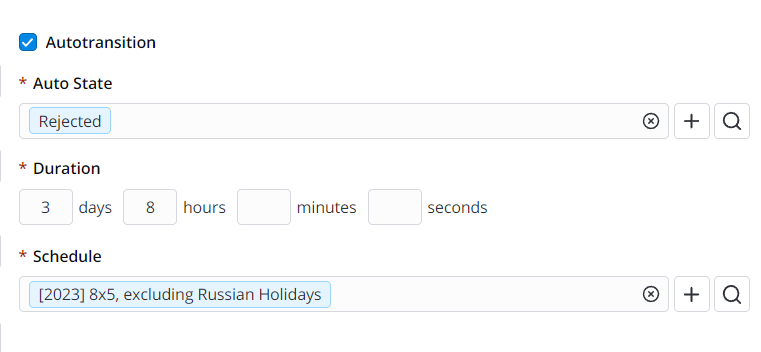
If you select the Autotransition checkbox and define fields like in the screenshot below, then the following setting will be applied:
- if the state does not change for 3 days 8 hours (on a 8x5 weekdays calendar; it's equivalent to ten working days 8 hours each), then the state will change to Rejected.
