LDAP Integration
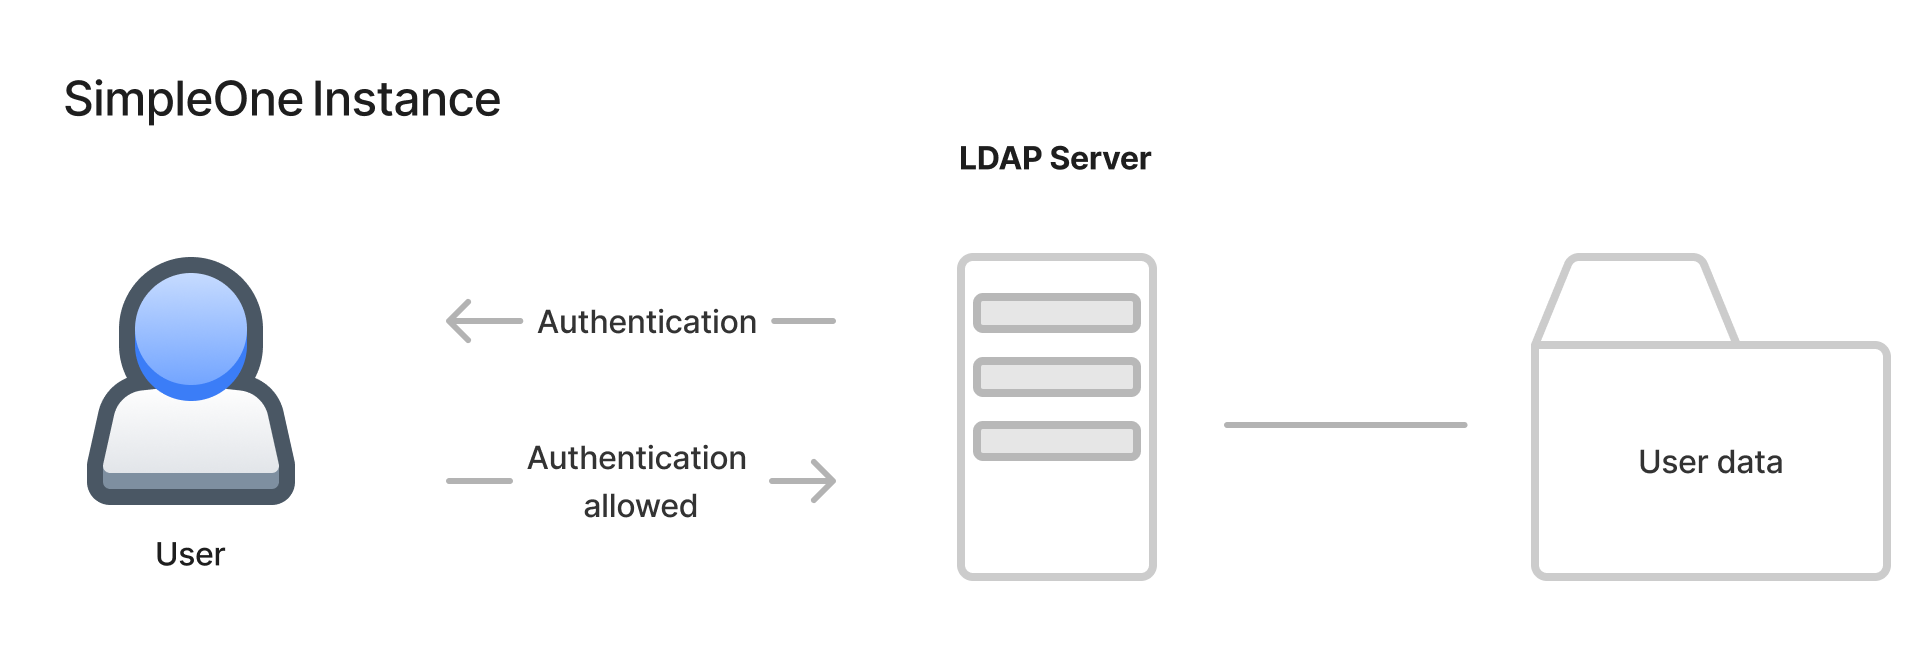
LDAP integration allows you to connect the instance to LDAP or AD server and use it as a source of the user data. It provides the ability to connect to a directory service storing the authentication data, such as usernames, passwords, user home directories used for keeping business and other data. The global objective of the LDAP engine is importing users into the system. And through this, synchronization with various corporate services can be achieved, and one account can be used to authorize in all corporate services, such as email, website, VoIP, and so on.
The RDN (relative distinguished name) is the attribute defining the search directory, like this: dc=instance,dc=com
In this client-server infrastructure scheme, the SimpleOne instance has to be a client connecting to the LDAP server.
The users can authorize with user.ldap_autoprovision property.
When a user that has an account in the LDAP service catalog, but has not in the system, independently attempts to authorize, a user record is automatically created on the instance with a generated email in the format {random string of 10 characters}@simple.test.
- If user accounts are created by importing via LDAP, set the user.ldap_autoprovision property to false.
- If autoprovision is necessary, then manually update the fields in the user record to the correct values.
- The system synchronizes with the LDAP server only via the Schedule Jobs – scheduled script that defines periods of synchronization (for example, every 3 hours). See the Scheduled Scripts article to learn more.
You can also use third-party authorization services on your instance. See the Single Sign-On article to learn more.
Some LDAP features can be configured on the client side using system properties. Available properties can be found in the LDAP Properties article.
Establish an LDAP connection
To establish the connection between your SimpleOne instance and the LDAP server, complete the following steps:
- Specify the LDAP server.
- Define the LDAP URL.
- (optional) Add a certificate to create a secure LDAP connection.
- Set up the LDAP Setting.
- Check settings.
- (Optional) Data import.
Additional tools for setting up LDAP connection:
Specify an LDAP server
To configure an LDAP connection, complete the steps below:
- Navigate to LDAP → Create New Server.
- Fill in the fields.
- Click Save to apply the changes.
- Copy the current record ID.
LDAP Server form fields
| Field | Mandatory | Description |
|---|---|---|
| Name | Y | Enter the server name. |
| Root directory | N | Enter the RDN of the search directory. Example: dc=instance,dc=ru |
| Active | N | Select this checkbox to make the server active. |
| Username | Y | Specify the username authenticating the LDAP connection. |
| Password | N | Specify the server password. |
If the RDN attribute is not specified, then the LDAP server will attempt to reach the server root directory during the authorization process. If the user logging in is not authorized to access this directory, the authorization process will be interrupted.
Define an LDAP URL
Sometimes, customer infrastructure may contain more than one LDAP server, for example, as a standby (reserve) server. In this case, you may need to specify some particular server used for authorization by arranging the URL order. If you have more than one server, create a separate LDAP URL for each of them.
To create a URL, complete the steps below:
- Navigate to LDAP → LDAP URL.
- Click New and fill in the fields.
- Click Save or Save and exit to apply the changes.
LDAP URL form fields
| Field | Mandatory | Description |
|---|---|---|
| URL | Y | Enter the LDAP URL there. For example: ldap://123.456.1.12:363. |
| Active | N | Select this checkbox to make the URL active. |
| Order | N | Specify the order of this URL if there are more than one similar items. In this case, they will be processed in ascending order. |
| Operational status | N | State of the LDAP connection. Available options:
|
| Server | Y | Specify the relevant LDAP server. |
Add a certificate
If you need to establish a secure LDAP connection over SSL or LDAPS via port 636, provide the SSL certificate. If you do not have a valid certificate, the LDAP connection will be insecure. In this case, use port 389 (TCP/UDP).
To add an LDAP certificate, complete the steps below:
-
Navigate to LDAP → Certificates.
-
Click New and fill in the fields.
-
Attach the SSL-certificate file.
noteCertificate requirements
- To work correctly, the certificate must be a root one (CA).
- The supported PEM (Privacy Enhanced Mail) formats have the following extension: .pem, .crt, .cer.
- Files must be Base64 encoded and start with "----- BEGIN CERTIFICATE -----" and end with "----- END CERTIFICATE -----".
-
Specify the Name of the certificate and select the Active checkbox. You can also add Short description. The values for other fields are taken from the attached file.
-
Click Save or Save and exit to apply the changes.
Certificate form fields
| Field | Mandatory | Description |
|---|---|---|
| Name | Y | Specify the record name to identify the certificate in the list. |
| Subject | N | The certificate attributes. This field is automatically populated based on the provided certificate data. For more information about these attributes, see the RFC 5280 documentation. |
| Issuer | N | The certificate issuer. This field is automatically populated based on the provided certificate data. |
| File path | N | This field is not used. |
| Short description | N | Add a brief description for the record. |
| Active | N | Select this checkbox to activate the certificate. |
| Valid from | N | The date from which this certificate is valid. This field is automatically populated based on the provided certificate data. |
| Valid to | N | The date until which this certificate is valid. This field is automatically populated based on the provided certificate data. SimpleOne does not validate the value of this field but the connection will not be established if the certificate is expired. |
You can see the list of added certificates from the LDAP Server record form. To do so, click Certificates list.
LDAP setting
After you configured an LDAP server and an LDAP URL and performed all necessary customer infrastructure preparations, set up an LDAP.
To configure the LDAP, perform the following steps:
- Navigate to LDAP → LDAP Settings.
- Click New and fill in the fields.
- Click Save or Save and exit to apply the changes.
LDAP Setting form fields
| Field | Mandatory | Description |
|---|---|---|
| Name | Y | Specify the LDAP setting name. The name you enter here becomes a target in the Import Sources record. |
| Active | N | Select this checkbox to activate the LDAP and to allow data import. |
| Relative distinguished name (RDN) | N | Enter the relative distinguished name (RDN) of the subdirectory to search through. |
| Server | Y | Specify the LDAP server containing users and groups directory and other information related to LDAP. To configure the server, navigate to LDAP → LDAP Servers and perform the needed actions. |
| Table | Y | Select the target table that will store data from your LDAP server. For users, select the Users (user) table. The target table specified is used for LDAP auto-provisioning (automatic creation of ****users in the Users (user) table). |
| Filter | N | Enter a filter string to select specific records to import from the OU (organizational unit). For example, this filter specifies the excerpt, as shown below:
(&(objectClass=person)(sn=)(!(objectClass=computer))(!(userAccountControl:1.2.840.113556.1.4.803:=2))(!(userPrincipalName=.admin@simpleone.ru))) For more information about the LDAP filter syntax, refer to the appropriate RFC document. |
| Query field | N | Specify the attribute name within the LDAP server for querying the records. Active Directory mostly uses the sAMAccountName attribute. Other LDAP servers tend to use the cn attribute. Note that Query field is temporarily not working correctly – our team is working on its logic improvement to make it more efficient and secure. We will inform you about changes in the next releases. |
| Attribute list | N | Use the field to specify (include and limit) the attributes the LDAP query returns. This approach is preferable for large LDAP imports in terms of timing. If the field remains empty, the system loads all the objects with their attributes that your LDAP server is allowed to read. |
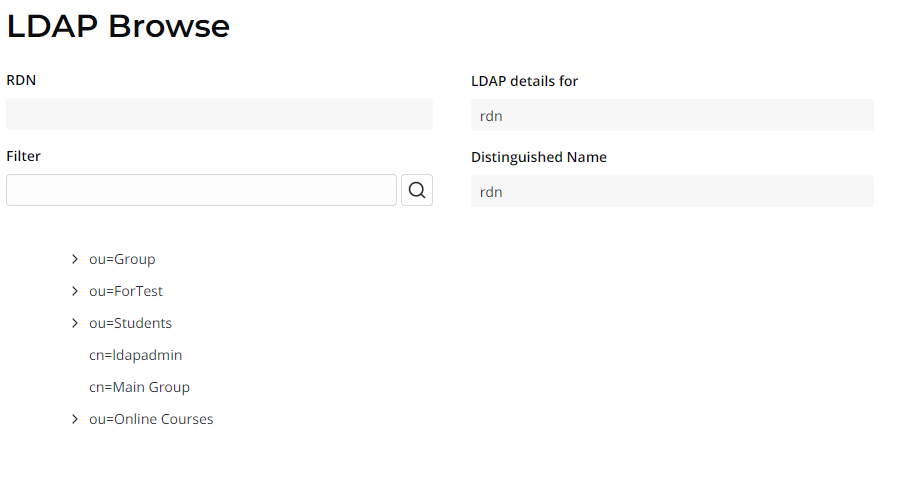
You can check the LDAP structure by clicking the Browse LDAP on the corresponding LDAP Server record.
Check settings
Ensure that the connection is set up by performing the following steps:
- Navigate to LDAP → LDAP Servers.
- Open the record you need.
- Click Test connection to check the first URL connection defined by the order. If the connection is fine, the Successfully connected message appears.
- Click Test all connections to check all defined connections. If the connections are fine, the All connections are checked message appears.
If an error is thrown, check LDAP log records.
LDAP import
Import all necessary data from your LDAP server to the instance.
To complete the data import using LDAP, set up the following system elements:
- LDAP Settings – specifies filters for retrieving data from a defined LDAP table.
- Import Source – loads row of data for further processing and transformation. The scheme below illustrates the process of data import from an LDAP server.
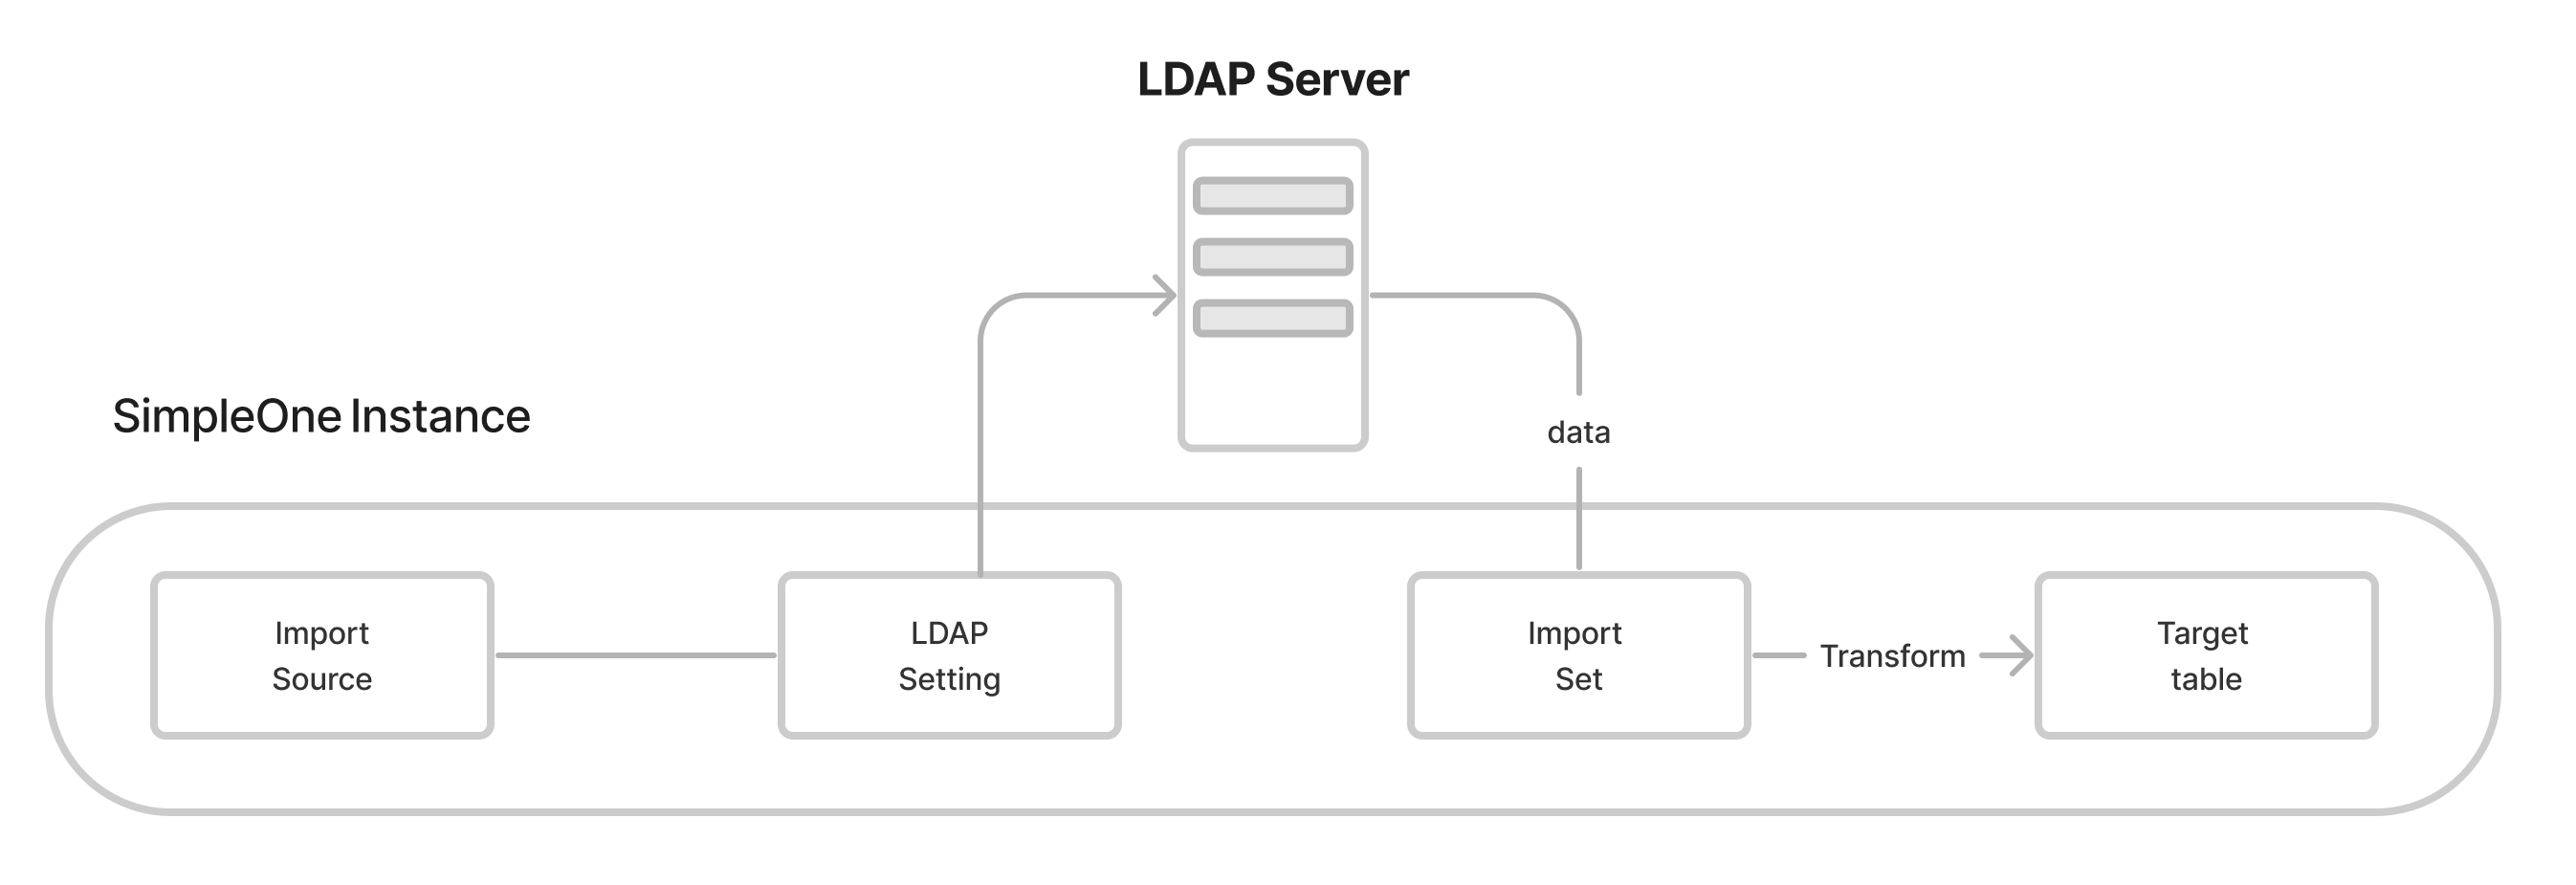
See the LDAP Import Source article to learn more.
LDAP log
If an error occurred in the system, you can check the log messages to find the cause. In the LDAP Log, you can find records of failed authorization attempts or attempts to bypass authorization policy. In fact, all these messages are recorded into the Logs (sys_log) table.
To see the LDAP logs, navigate to LDAP → LDAP Log.
LDAP Log form fields
| Field | Description |
|---|---|
| Source | Displays the source from where this log record comes from (LDAP Authorization or LDAP Autoprovision, as an example). |
| Message | The log record message text. |
| Level | This field specifies the error level. Available options:
|
| Username | Contains the reference to the user who initiated this record creation. |