List Interface
In SimpleOne, records are presented in two ways: in lists and in forms. Each representation consists of a number of elements and provides various ways to interact with records. In this article, the list interface is described.
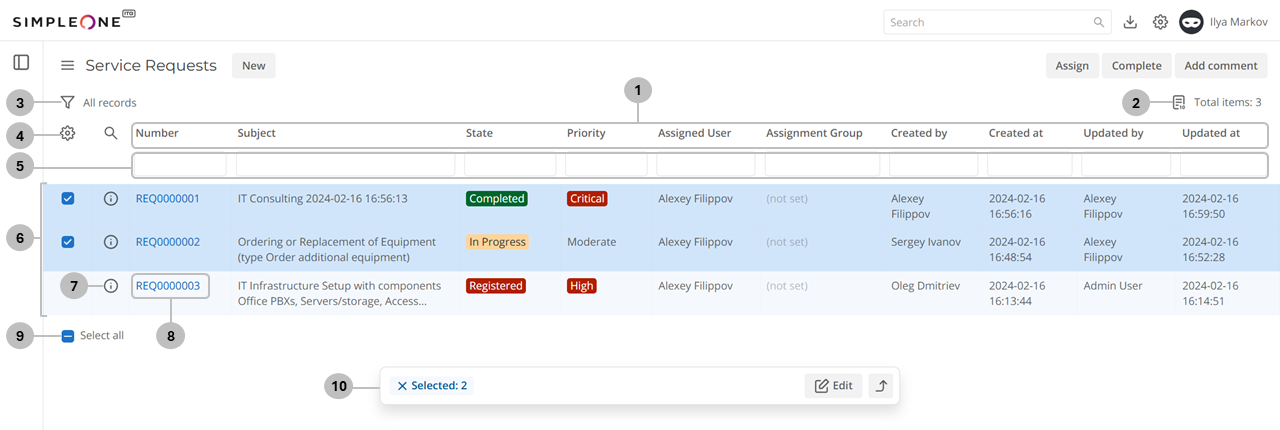
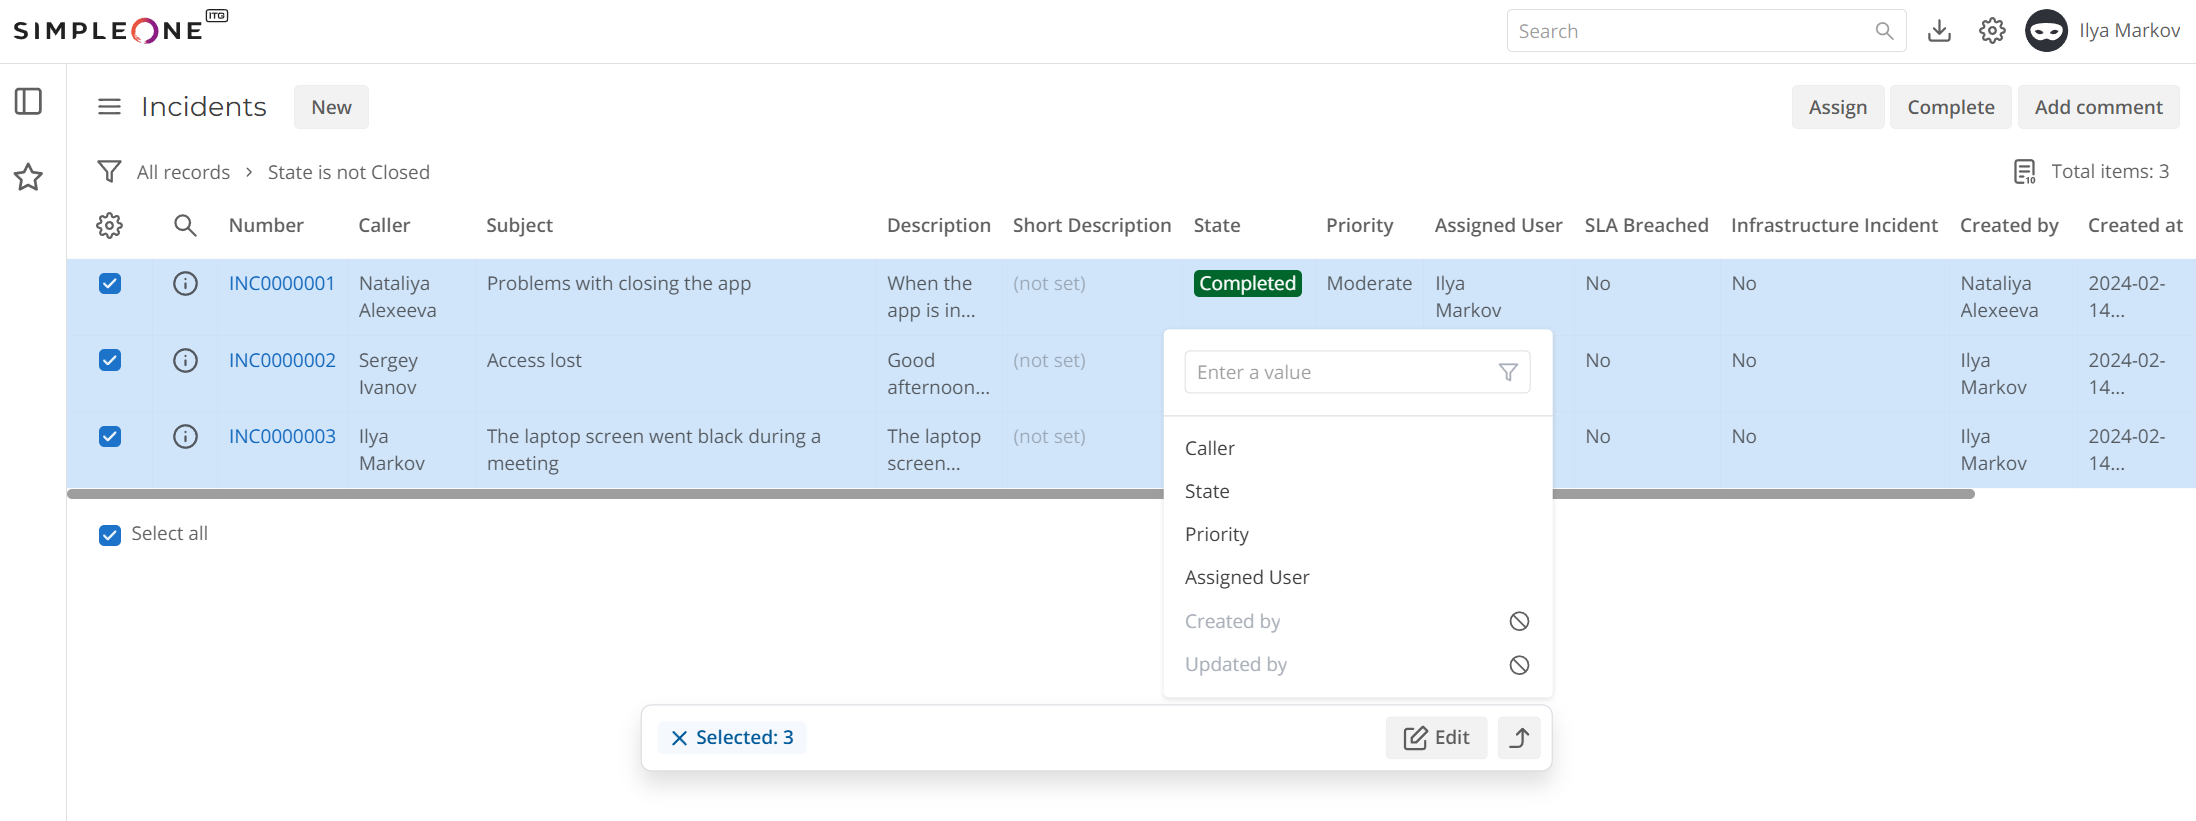
The list interface includes the following elements:
-
Columns – names of columns of the current table. Click a column name to open the context menu.
infoYou can expand the list layout and personal list layout with record extended model (REM) attributes. On the list interface, models are shown with the M icon, while their attributes are marked with A.
-
List – click the icon to select the number of items displayed per page. The number of records displayed by default is configured in the Preferences menu.
-
Funnel – click this icon to use the condition builder for filtering.
-
Gear icon – click this icon to change the set and order of columns displayed.
-
Search boxes – click the magnifier icon to the left of column names to open the list search boxes. Here, enter the value that a column should contain to find certain records.
-
List of records – records included in the table displayed in rows. You can select records using the checkboxes on the left to perform group actions. By default, the records in lists are sorted by the ID column in descending order.
-
Information icon – click this icon to see preview information about the record.
-
Cell – the column value of a certain record. You can change the value using inline editing.
-
Select all – click to select or deselect all records in the list. The checkbox takes the intermediate state when a part of records is selected.
-
Editing panel – click Edit to change field values in all the selected records at once. On the panel, Selected displays the number of records selected in the record list. Click to deselect all these records. You can also move the editing panel up by clicking .
Enable the compact view
You can enable the Compact view in your Preferences.
The list compact view can also be configured in the compactView attribute of the <recordList> SimpleTag. Its value has priority over the Compact view setting.
The compact view allows you to display more information on the screen. It features a denser list layout and hides applied filter conditions under a counter. You can view and manage the conditions by clicking the funnel icon next to the counter.
Configure the record number
To configure the number of records displayed in the lists, set the options in the simple.list.record_count_options.
To set the default number of record to be displayed in the lists, select the preferred option in the Number of records on lists field of the Preferences menu.
To set the number of record in specific lists, click and select the desired number of record to display per page. The selected user options will be saved in user preferences.
The list.pagination.enable_pages_calculation property enables the counting of items for pagination.
The list.per_page property allows you to customize the number of records for the list by default.
- Navigate to System Properties → All Properties.
- Find the property record you need using the list search boxes or the condition builder and open it.
- In the Value field, enter the necessary value.
- Click Save or Save and exit.
Configure inline editing
You can lock selected columns for editing to protect them from being changed, bypassing client scripts.
Inline editing is unavailable for REM attributes.
To lock columns for editing, follow these steps:
-
From the table form view, click Configure inline editing.
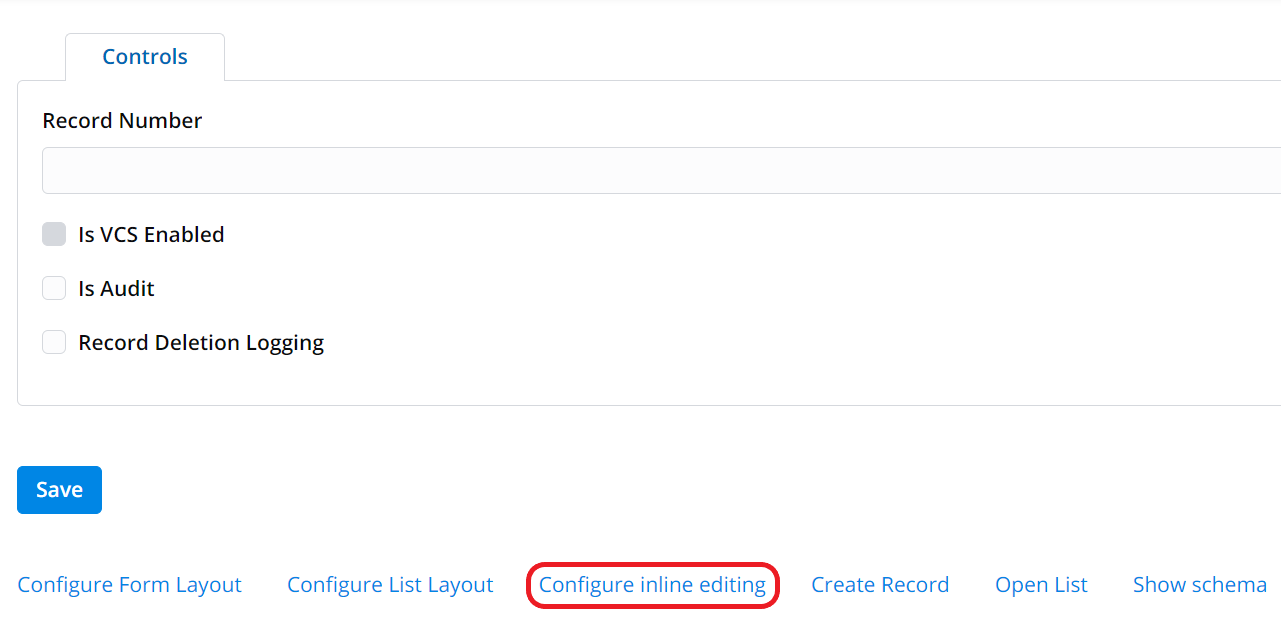
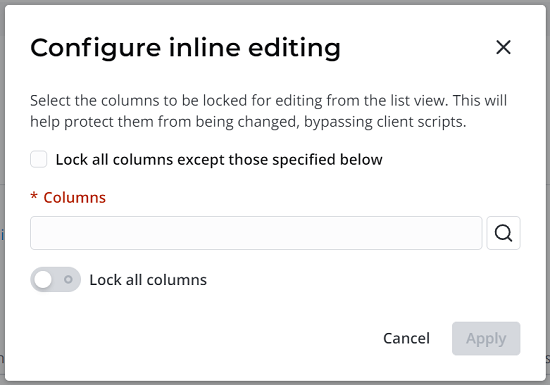
A modal window appears.
-
Depending on your purpose, you can lock:
- a single column: start typing in the input field and select an item from the auto-suggest list.
- multiple columns:
- click the magnifier icon right to the input field. In the window that appears select the checkboxes corresponding to the columns you wish to lock and click Select items.
- to remove a column from the input field, click the close button on its badge.
- all columns except for the selected ones: select Lock all columns except those specified below.
- all columns: switch Lock all columns.
-
When all settings are done, click Apply.
Unless Lock all columns is switched, you must fill in the Columns field to click Apply.
To revert the changes you have made, click Reset settings and click Reset in the dialog box that appears. The Reset settings button is only available if you made any configuration changes previously.
- The inline editing restrictions can be inherited from parent tables. By default, the lock status of columns in a child table is the same as in the parent table.
- You can override the inherited status by configuring inline editing for the child table.
- When you reset settings for a child table, the settings inherited from its parent become active again.
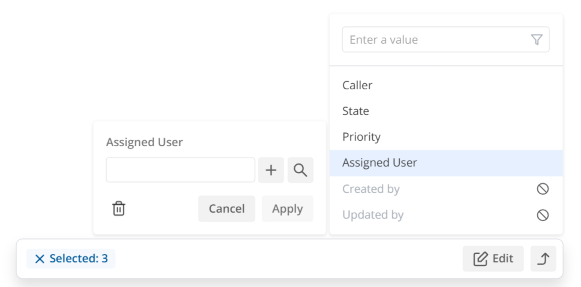
Bulk editing
The maximum number of records that can be edited at once is set in the list.editing_selection_limit system property. If you select more records than is allowed, you will not be able to apply the changes. The corresponding buttons on the editing panel will be unavailable until the number of selected records is within the set limit.
Using lists, you can edit field values in several records at once. To do this, complete the following steps:
-
Navigate to the table whose records you need to edit.
-
Select the checkboxes next to the records you need to edit.
-
On the editing panel that opens, click Edit.
-
In the dropdown list, click the name of the field whose value you want to change in the selected records. You can also use the search bar. The icon next to a field name means that this field is unavailable for editing.
Fields available for editing
You can edit the Reference and Choice fields that are added to this list view. However, you cannot edit:
- system fields such as ID and Created at;
- unique fields;
- fields whose editing is forbidden by access control rules;
- fields locked for inline editing.
Child tables cannot be edited in bulk from their parent table.
-
Select the appropriate field value and click Apply. You can also clear this field's value in the selected records by clicking . This icon is inactive if the field is mandatory. It is not displayed for the fields of type Choice.
-
To view the updated field values, reload the page. Until you do, the fields will be unavailable for inline editing.
When you apply the changes, the system performs an access control rule check. Any values you select for the fields of type Reference are also checked for matching the reference qualifier. The records that were not updated as a result of failing these checks are listed in the Main Log.
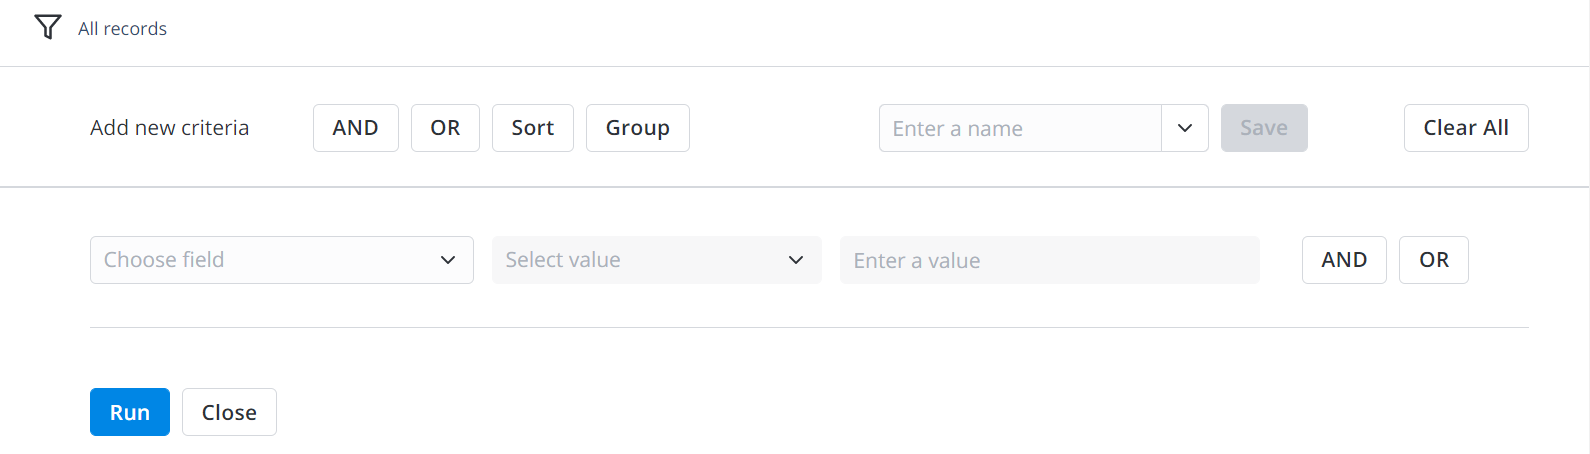
Condition builder
Condition builder is a tool that allows for creating conditions to select fields with specific values and sort them in a particular order.
It is available for the following elements:
- lists (click the funnel icon above the table)
- forms in Condition fields.
- record picker window (click the magnifier icon by the reference fields)
- the Related Lists area (click the funnel icon above the table).
To create filters, complete the following steps:
-
Click the funnel icon to open the condition builder.
-
Add dependencies using the AND and OR buttons. Also, you can add high-level conditions using these buttons in the condition builder toolbar.
-
Click Run to apply filters and get the selection of records.
- You can also delete them by clicking the Clear All button.
Other available actions:
-
Sort – adds conditions of the fields sorting.
-
Group – groups the records by a specific column. Not available for condition fields.
-
Save – saves the configured conditions. Not available for condition fields.
How to save a filter
- Configure the conditions you need.
- Enter a name of the filter and click Save.
- The saved filter will be available in the burger menu .
To apply a saved filter, navigate to the burger menu, click Filter, and select the option with the desired filter name.
-
Run – runs the configured condition to apply the filter. Not available for condition fields.
-
Close – hides the condition builder. Not available for condition fields.
On lists and in dictionaries, you can find breadcrumbs by the funnel icon . They represent applied conditions.
In the compact view, applied conditions are hidden under a counter. To view and manage the conditions, click the funnel icon .
To clear filters of the condition builder:
- click the arrow icon to clear one condition at the right.
- click the condition to clear all conditions except the selected one.
To add a list filter to the Favorites menu, drag and drop it to the Favorites navigation tab.
See the Condition Builder article to learn more.
Grouping on lists
Records in lists can be grouped. However, unlike regular lists, related lists do not support fixed (predefined) grouping.
Grouping and sorting is unavailable for REM attributes.
To configure the number of groups displayed on the page, set the list_groups.per_page property value.
To set up properties, follow the steps below:
- Navigate to System Properties → All Properties.
- Find the property record you need using the list search boxes or the condition builder and open it.
- In the Value field, enter the necessary value.
- Click Save or Save and exit.
Create a report
You can create reports directly from lists. Use the title context menu by right-clicking the list titles and selecting one of the following options:
- Open Pie Chart – present data with circular statistical graphics.
- Open Bar Chart – present data with rectangular bars.
You cannot create pie and bar chart reports on the REM attributes added to the list layout.
Import and export
Use the title context menu by right-clicking the list titles and selecting one of the following options:
- Import from JSON – import a JSON-formatted file to insert records to the database directly. Refer to the Quick Import article for more information.
- Export to Excel – export the list into an Excel file to use it later for various purposes. Refer to the Quick Export article for more information.
- Export to JSON – export the list view into a JSON-formatted file to use it later for various purposes.
The REM attributes added to the list layout are not included in the quick import, as well as the quick export to Excel and JSON.