SLA Indications SA
The SLA Indications SA widget visualizes the time left till the nearest SLA breach time. When the SLA indicators are set and the start conditions are met, the widget displays a countdown of relevant indications for the record. For example, the Incident table has an indicator that starts when the incident record is assigned to the Support team and ends when the work on the incident is completed. That is, the visualized indication will start counting down the time from the moment when the Assigned Group is Support; the indication will end when the State is Completed.
Widget interface
The widget consists of the following elements:
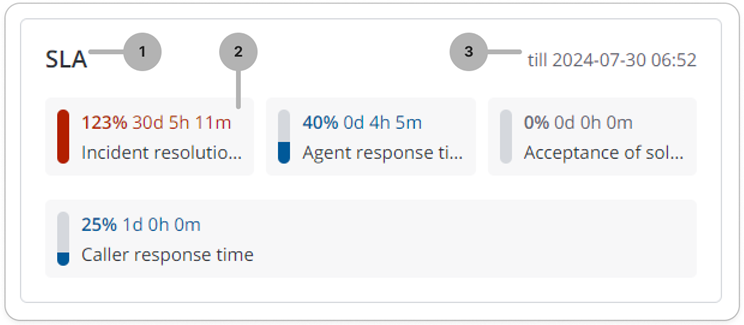
- Widget title. If you need to change it, create an SLA source message and add translations for it.
- Active indications of the record. You can configure the number of rows and the number of indications in each row. Each indication consists of the following elements:
- Capsular counter indicating the elapsed time.
- Time left until the the indication breach (deadline) in percentage.
- Time that passed after the start of the indication in days, hours and minutes.
- Indication name.
The color of the text and capsular counter illustrates the current state of the indication:
- The red color denotes that the SLA indication was breached, and some time has passed since then.
- The blue color denotes that the SLA indication was started, and some time has passed, but the indication has not been breached yet.
- The gray color denotes that the SLA indication has just been started (recently).
If the record has a breached SLA indication, the widget displays the date and time of the expired indication until it is completed or canceled. Deadlines of other indications are ignored. In the screenshot above, the indication named Incident resolution time is expired, so you see the elapsed time.
Displayed information
-
If the record has no active indications, the widget displays a corresponding message and a link to the list of all active indications.

-
Only relevant indications are displayed. Indications are created automatically when the start conditions of an active indicator are met.
-
Completed and canceled indications are not displayed.
-
Indications are displayed in ascending order from the left to right: the nearest breach time is on the left.
Configure the widget
The SLA Indications SA widget can be added to the tables extended from the ITSM Task (itsm_task) table. By default, they are not displayed on the form.
To display data about SLA breach time, the following should be configured:
By default, business time is used to display in the widget. To use actual time, enter {"time": "actual"} in the Configure the value of the widget options modal window when adding the widget to a form. Alternatively, edit the value of the Schema option values field in the corresponding Widget Instance record.
- Business time – the values of the Business time elapsed (business_elapsed_time), Business time left (business_left_time), and Business time elapsed in % (business_elapsed_percentage) columns.
- Actual time – the values of the Actual time elapsed (actual_elapsed_time), Actual time left (actual_left_time), and Actual time elapsed in % (actual_elapsed_percentage) columns.
Configure the widget options
You can set up the number of indications displayed in the widget and specify the minimal height of the widget in pixels. Notably, the minimal height cannot be less than the height of displayed elements.
To configure the values of the widget options, complete the following steps:
-
In the burger menu of the form where the widget is located, select Configure → Form → Layout.
-
In the Selected box, find the widget you need to configure. Click the icon to the right of the widget title.
-
In the Configure the value of the widget options modal window that appears, specify the widget parameters in JSON format.
Configure the value of the widget options{
"minHeight":"600px"
}
{
"layout":[3,2]
}- minHeight – set the minimal height of the widget in pixels. The minimum height cannot be less than the height of displayed elements.
- layout – specify the number of indications in each row. Use commas to separate the values. The maximum number of indications in a row is four. If a larger number is specified, four indications are displayed per row in any case. If the layout parameter value is not specified, the widget displays one row with three indications. If the widget options include more indications than the record has, the widget layout still matches the specified values, and empty rows may be displayed.
-
Click Save to apply the changes.
Set up indicators
To set up an indicator, perform the following steps:
-
Navigate to Indication Management → Indicator.
-
Click New and fill in the fields.
-
Select the Active checkbox to enable the indicator.
tipEnsure that the cancelation conditions are set up correctly: if the specified conditions are met, the indication is canceled and the widget does not display it.
-
Click Save or Save and exit to apply the changes.
When the Start Conditions are met, a new record is created automatically in the Indication table and the SLA Indications SA widget starts displaying the indication.