Workflows
Workflow is a tool that allows you to configure complex processes in the system. The Workflow Editor visually displays processes as a set of boxes and arrows representing transitions, conditions, and stages. Set the sequence of stages and steps to create the necessary logic by using various types of activities: utilities, conditions, approvals, subflow, and timer.
Workflow is a logical sequence of activities describing a process. It consists of the following parts:
- Properties: general information and settings of the workflow, such as its name, the table for which the workflow is created, the conditions for starting the process, and the description of the workflow.
- Versions: the records of created workflows. All versions are stored in the Workflow Version (wf_workflow_version) table.
- Activities: a set of operations arranged in a specific order and performed by the workflow (for example, changing the value of a certain field).
- Activity Exits: conditions that should be met to proceed to a particular transition.
- Transitions: the connection between the activity exit and the next activity.
- Contexts: information about each workflow execution that is stored in the Workflow Context (wf_context) table.
Workflow life cycle
The workflow starts when the conditions specified in the parameters are met. Usually, the starting conditions are the insertion of a record, update of a field, or a field with a certain value. For example, the Incident table has a workflow that is executed each time a new record is created.
After the start event, the workflow executes activities one after the other according to the defined transitions. Typically, activities have more than one transition – the path they take depends on the activity outcome.
Within an activity, the workflow performs the following steps:
- The operation defined by the activity is performed.
- The activity conditions are checked.
- Depending on the conditions checking results, the workflow proceeds to the defined activity.
Workflow states
There are two workflow states:
- Checked out – for editing new or existing workflows.
- Published – for the workflows that are ready to be executed; finalized but unpublished workflows are inactive and non-functional.
Checked out
When you start working on your workflow (whether a new or existing one), it is in the Checked out state. Other users cannot edit this workflow with you because it is already checked out. Also, the workflow is inactive when it is checked out; the workflow needs to be published to enable it.
To enable editing a published workflow, perform the following steps:
- Open the workflow you need in the Workflow Editor.
- Navigate to the burger menu .
- Click Check out.
Published
When the workflow configuration is completed, and the process is ready to run, you need to change the workflow state to Published. Users are not able to edit the workflow, until it returns to the Checked out state.
To publish a workflow, perform the following steps:
- Open the workflow you need in the Workflow Editor.
- Navigate to the burger menu .
- Click Publish.
A workflow starts when a user who created it meets the specified conditions. It starts even if the workflow is not published yet and is not available to other users. The workflow is executed for the process owner with the unpublished changes. For other users, the latest published workflow version is executed.
Workflow versions
When you create or update a workflow, a new record is created in the Workflow Version (wf_workflow_version) table. The process is as follows:
- You create a new workflow (version 1). A new record is created in the Workflow Version (wf_workflow_version) table. It has the Checked out checkbox selected and the Published checkbox cleared.
- After you publish the workflow, its version record has the Checked out checkbox cleared and the Published checkbox selected.
- If you later checkout the workflow to modify it, the following happens:
- A copy (version 2) of the existing workflow is created as a new record in the Workflow Version (wf_workflow_version) table. It has the Checked out checkbox selected and the Published checkbox cleared.
- The existing workflow is not affected.
- After you publish version 2 of the workflow, the following happens:
- The version 1 is moved to the workflow archive (its version record has both Checked out and Published checkboxes cleared).
- The version 2 is now active.
Workflow contexts
The execution of workflows is reflected in the table of Workflow Context (wf_context) table. To view the list of active contexts, navigate to Workflow → Active Contexts. To view the list of all contexts, navigate to Workflow → All Contexts. By viewing the contexts in the Workflow Context (wf_context) table, you can get more information about the execution of workflow blocks. The context form displays the following fields:
| Field | Description |
|---|---|
| Name | The name of the workflow. |
| Workflow version | The related record of the workflow version. |
| Table | The table the workflow is used on. |
| Related record | The reference to the target record. |
| Scratchpad | The contents of the scratchpad object used in the workflow scripting. |
| State | The current state of the context. Possible options:
|
| Due | The context deadline. |
| Started at | Start date and time. |
| Ended at | End date and time. |
| Started by | The initiator of the context. |
The context form also contains the Workflow Executing Activity related list. The order in which the context activities are executed is specified in the Execution order column.
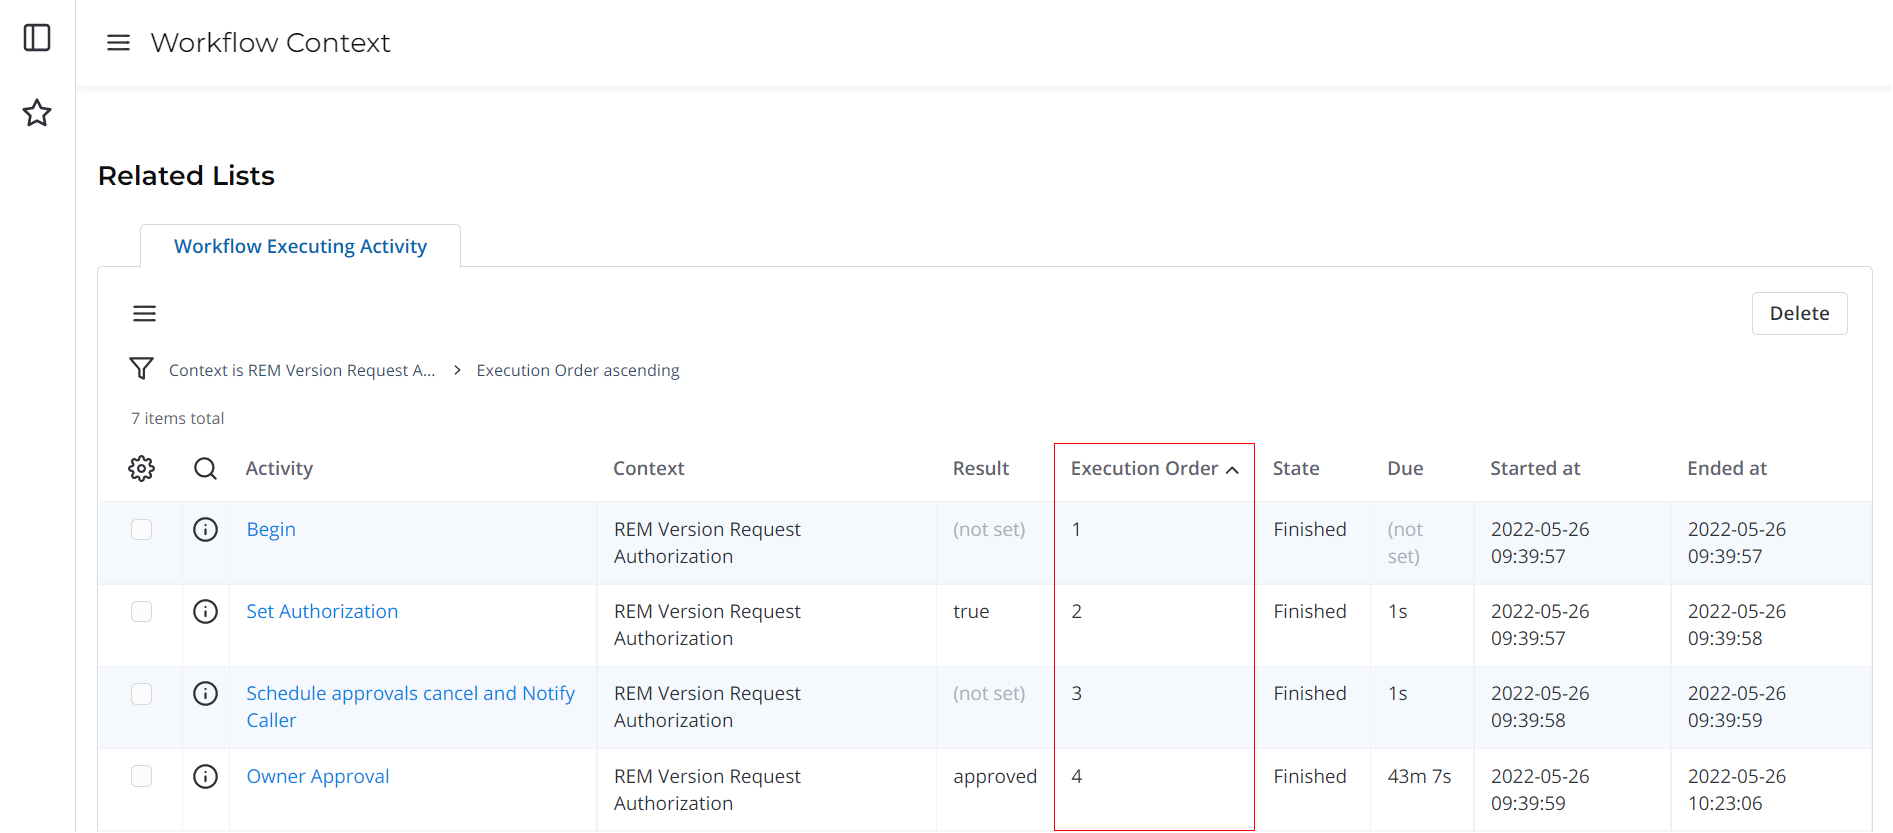
You can view a graphical representation of the workflow execution context. To do so, open the record form for which the context is created and click Show workflow:
The following window appears:
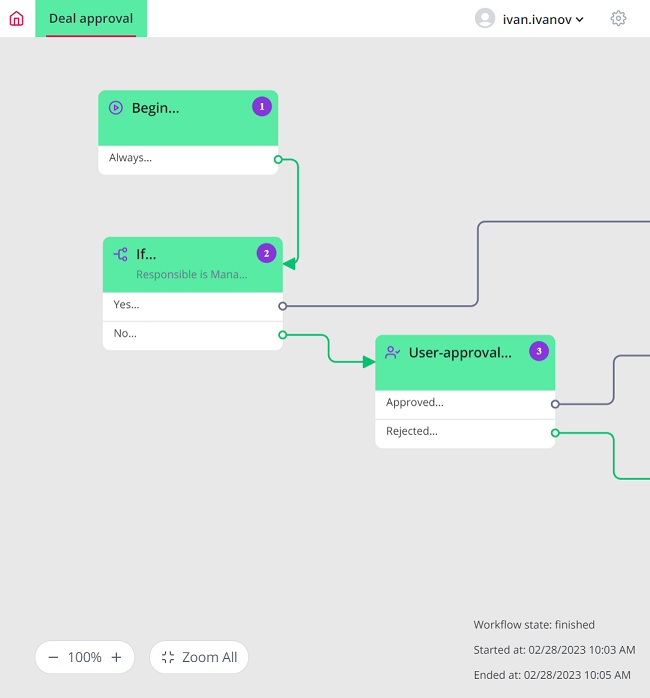
- The state of the workflow, as well as the date and time of its start and end, are displayed in the lower right corner.
- Use the mouse wheel or zoom controls in the bottom left corner to move around the canvas.
- Double-click a block or an exit to open a sidebar with its properties and information about it.