Sprints
Consider the value of the Team capacity, SP field located on the project form when you plan sprints. This field shows the amount of work that the team can complete within a sprint. It is calculated as the sum of project team members' capacities.
To open the Sprint planning widget, complete the following steps:
-
Open the board of an active Scrum project.
How to open a task board
- Navigate to SDLC → General Settings → Project Boards, open the required Board form and click Open board button.
tipRole required: pda_admin.
- Navigate to SDLC → Projects → All Projects / My Projects, open the required Board form and click the Open board button.
tipRole required: pda_user, pda_admin.
-
To open the widget, click the Start sprint button or Sprint planning option in the board action menu if you already have an active sprint. To return to the board, click the icon.
You can also open the widget from the form of a sprint. To do so, click Open planning button in the right upper corner of the form.
Access to sprints
| Operation | pda_admin | pda_user | Other roles |
|---|---|---|---|
| Create, Write, Delete, Start, Complete | + | Allowed for:
| - |
| Read | + | + | + |
| View Sprint planning widget | + | Allowed for:
| - |
Create a sprint
To create a sprint, complete the following steps:
- Open the Sprint planning widget.
- Click near the Sprints label.
- Fill in the New sprint modal window fields and click Create.
OR
- Open the required Scrum project form. Ensure that the Product development checkbox is selected for the project.
- Click New in the Sprints related list and fill in the form fields.
- Click Save or Save and exit to apply the changes.
New sprint modal window / Sprint form fields
| Field | Mandatory | Description |
|---|---|---|
| Start date | Y | Specify when the sprint should start. The field is automatically filled in according to the following logic:
Start date cannot be earlier than the current date. |
| End date | Y | Specify when the sprint should end. The field is automatically filled in using the formula (Start date + Sprint duration specified on the project form - 1 day). The end date cannot be earlier than the start date. If you specify dates that do not correspond to the Sprint duration on the project form, then when you start the project, the End date changes to match the Sprint duration. At the moment, the formula for the calculation of sprint duration differs depending on whether you add a sprint from a form or the widget. When the sprint is created from the form, 1 day is not subtracted from the sprint duration. It is recommended to create sprints in the Sprint planning widget. |
| Start date | Y | Specify when the sprint should start. The field is automatically filled in with one of the following values:
|
| End date | Y | Specify when the sprint should end. The field is automatically filled in in using the formula ( At the moment, the formula for the calculation of sprint duration differs depending on whether you add a sprint from a form or the widget. When a sprint is created from the form, 1 day is not substracted from the sprint duration. It is recommended to create sprints in the Sprint planning widget. |
| Sprint goal | N | Specify the sprint goal. |
| Release | N | Specify the release that will include the sprint tasks. The field is only displayed when the project is related to product development. |
| Project | Y | Specify the project for which you create the sprint. The field is filled in automatically. If you create the sprint from the related list of the project form, you can change the value. Once the record is saved, the field is read-only. |
By default, the sprint is assigned with the title Sprint X, where X represents a natural number starting with 1. The system checks if there already is a sprint with such a title. If there is one, a sprint with the next number is created. Thus, if there is a Sprint 1 in the system, the next one is titled Sprint 2.
The SDLC Tasks related list is located on the sprint form. It contains all sprint tasks.
Manage sprints
All sprints created for a Scrum project are displayed in the Sprints related list on the project form if the Product development checkbox is selected for the project. You can open the sprint form and edit the sprints from there.
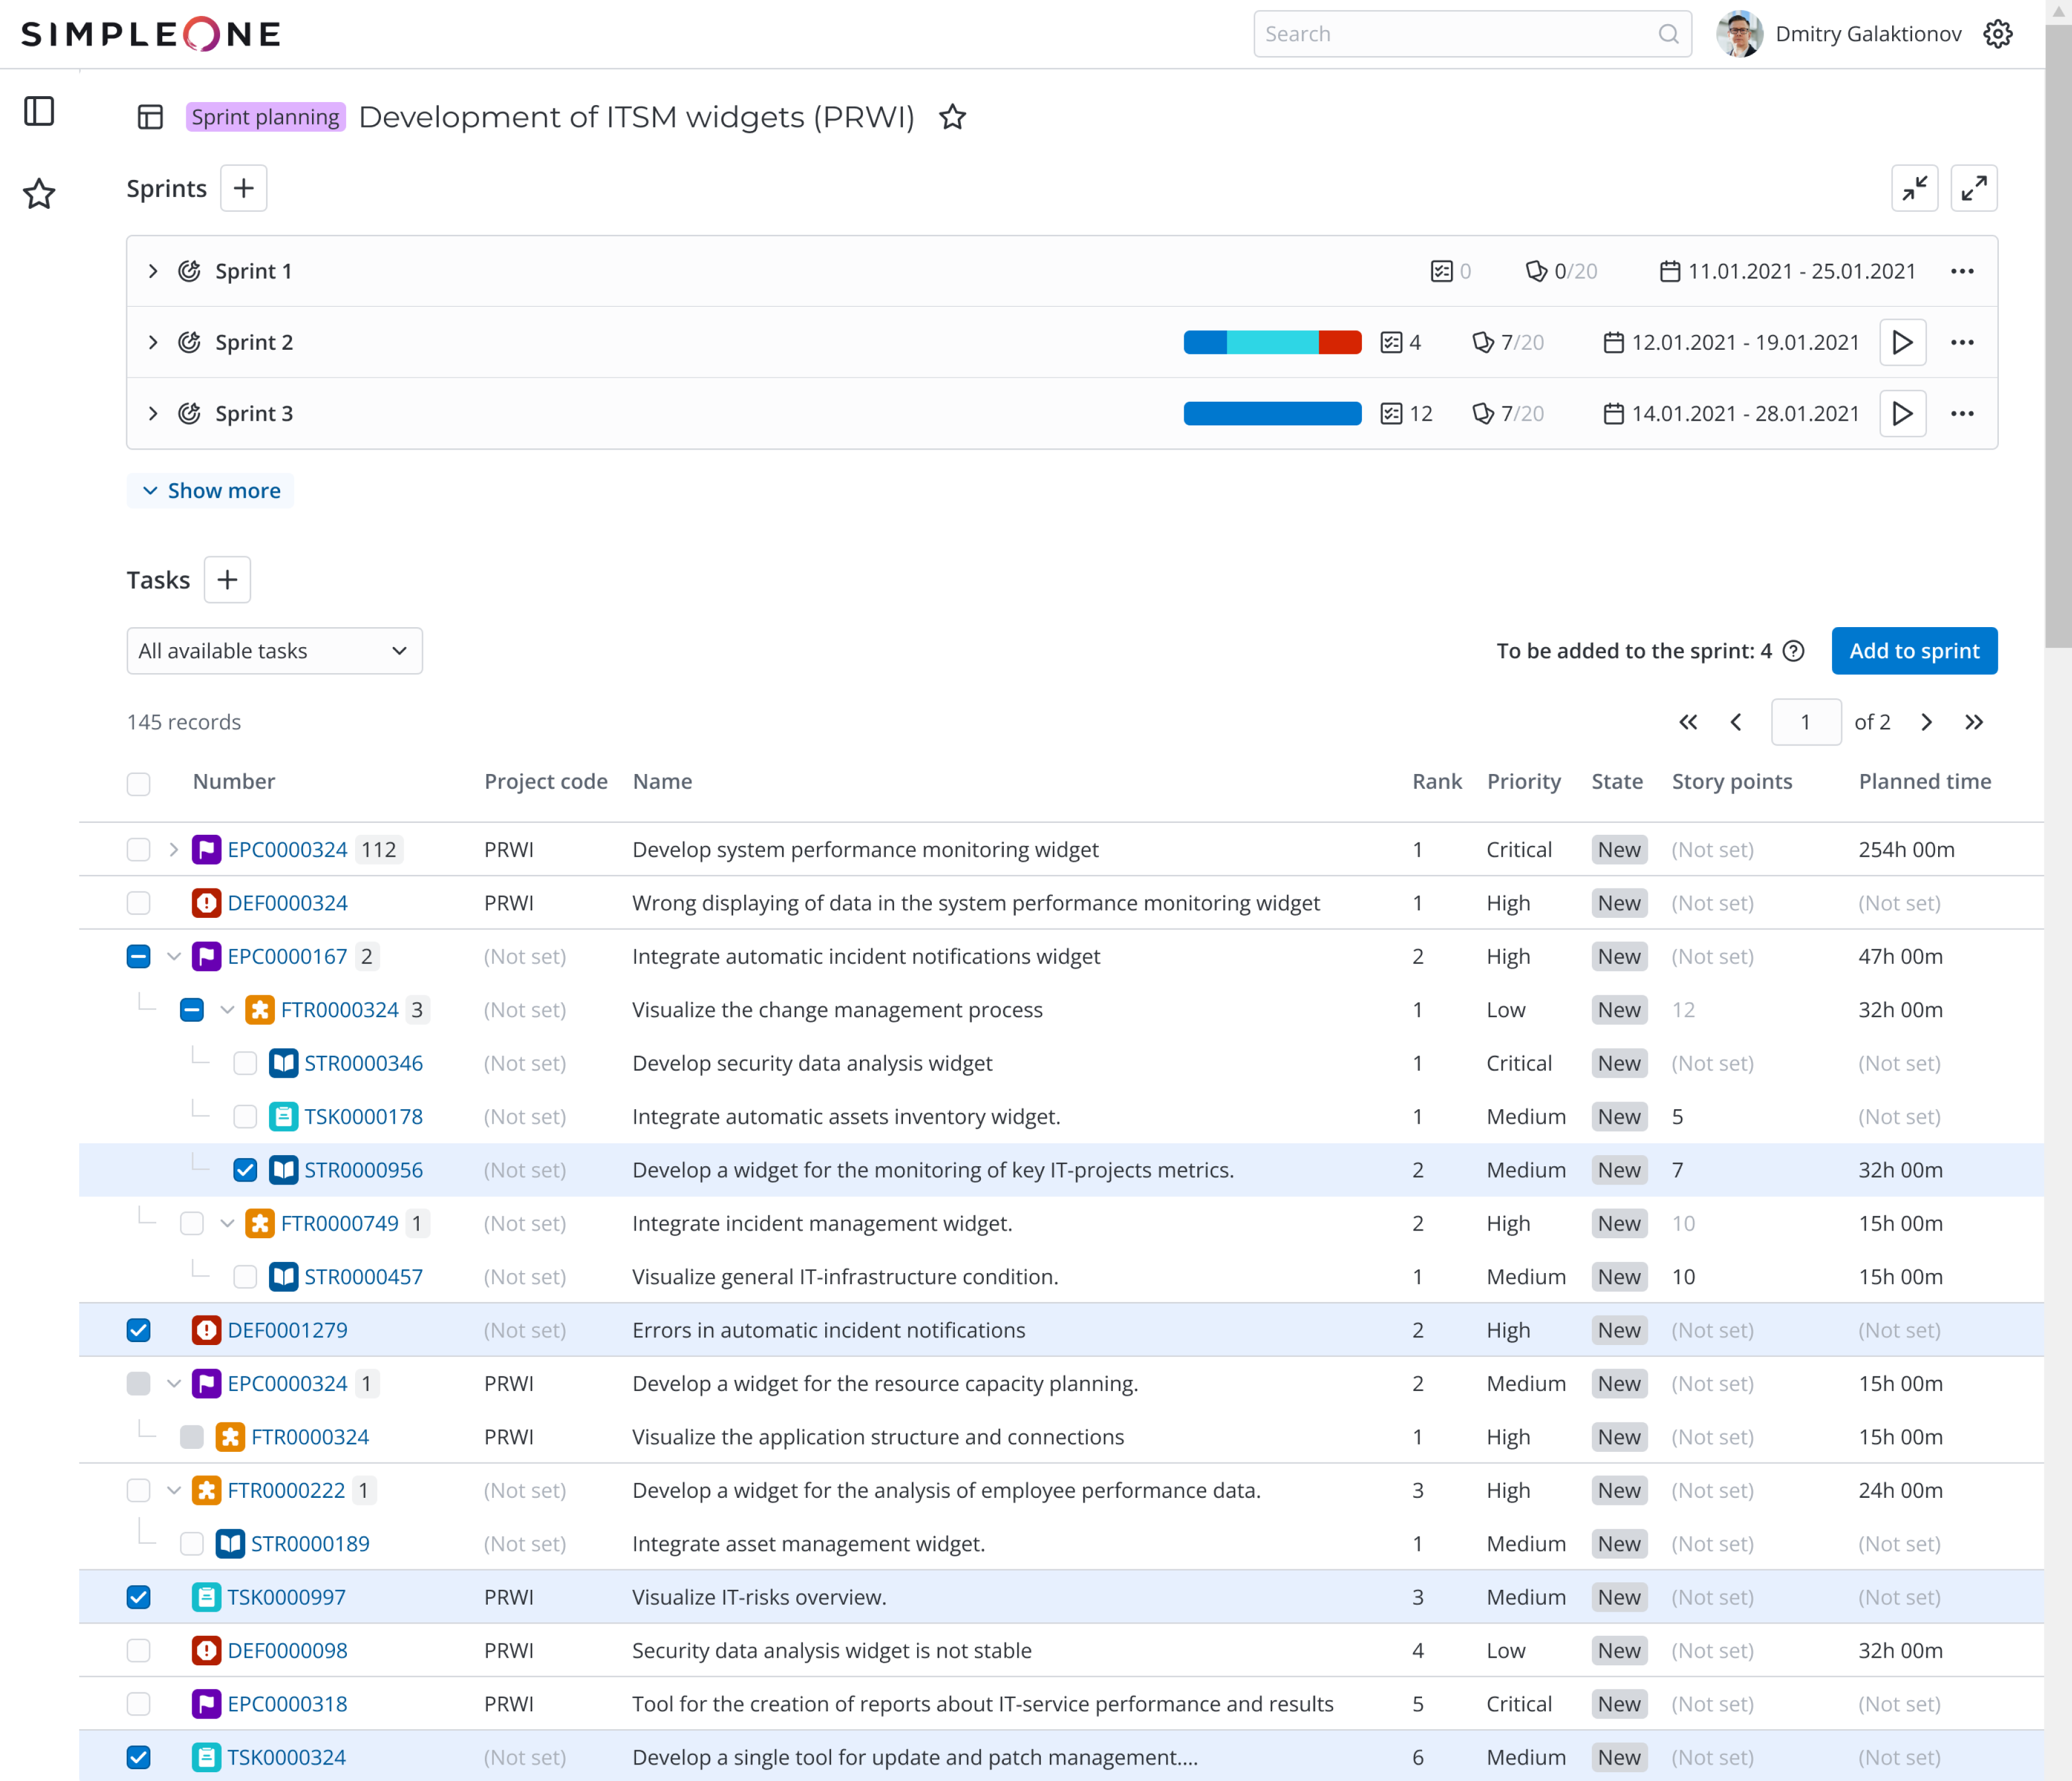
The New and Active sprints are also displayed in the Sprints panel of the Sprints planning widget. You can see major information about the sprints and manage them in this panel:

- Click to open the list of sprint tasks. The list only includes the tasks that have not been canceled.
- Click to see the hint with sprint goal.
- Sprint title. Click it to proceed to the sprint form.
- The correlation of task types included in the sprint. The element only counts the third level tasks that have not been canceled. Move the pointer over the stripe to see the selected task type percentage among the sprint tasks:

- The number of tasks in the sprint.
- Current sprint workload. The first number is the sum of third level sprint tasks story points, the second is team capacity.
- Start and end dates of the sprint.
- Start sprint button.
- Click to open the action menu of a sprint:
Use the action panel icons and to hide and show the task lists of all sprints in the widget.
You can delete a sprint by clicking the Delete option in the burger menu of the sprint form. The Sprint field will be cleared for all tasks of the deleted sprint.
Sprint state flow
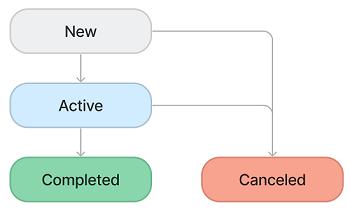
The sprint state can only be changed manually by performing a corresponding action.
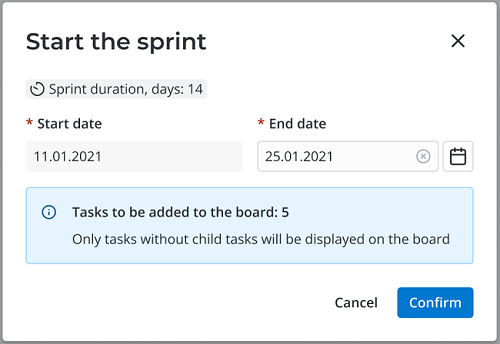
Start a sprint
- Only one sprint can be active at a time. If you already have an active sprint, complete or cancel it before you start the next one.
- You cannot start a sprint that has no tasks.
To start a sprint, complete the following steps:
- Open the Sprint planning widget.
- Find the required sprint in the list, click icon located near the sprint action menu.
- Specify the sprint end date and click Confirm. The current date is automatically used as the Start date.
When sprint is started:
- The sprint state changes to Active.
- If there are New tasks among the sprint tasks, their state changes to Backlog.
- The tasks of the started sprint are added to the board.
- The Start date field of the sprint form becomes read-only.
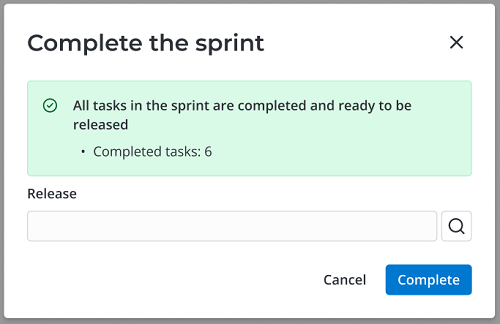
Complete a sprint
There are two ways to complete a sprint:
- Open the task board and click the Complete sprint button located in the right upper corner next the board action menu.
- Open the Sprint planning widget and click the icon next to an active sprint title in the sprint list.
If all sprint tasks are completed, follow the steps below:
- Select the release to be published.
- Click Complete.
The following changes take place when a sprint is completed without incomplete tasks:
- The sprint state changes to Completed.
- The Release field of the completed sprint tasks is filled in with the release selected at the sprint completion even if another release was selected originally.
- The fields of the sprint form become read-only.
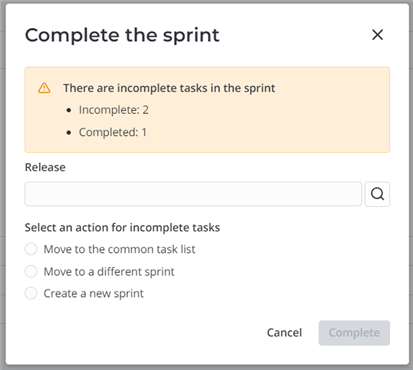
If some sprint tasks remain incompleted, follow the steps below:
- (optional) Specify the release that will include the completed sprint tasks, if there are any.
- Select action for incomplete tasks:
- Move to the common task list – select to clear the Sprint field for the tasks and move them to the list of project tasks that are not included in sprints.
- Move to a different sprint – select to specify an existing sprint that will include the tasks.
- Create a new sprint – select to create a new sprint that will include the tasks.
- Click Complete.
The following changes take place when a sprint is completed with incomplete tasks:
- The sprint state changes to Completed.
- Selected action is applied for incomplete tasks.
- For the tasks in the Done state, the Release field is filled in with the release selected at the sprint completion stage even if another release was selected originally.
- The fields of the sprint form become read-only.
Cancel sprint
To cancel a sprint, follow the steps below:
-
Open the Sprint planning widget.
-
Find the required sprint, click Cancel sprint in the sprint action menu.
-
Select what to do with the sprint incomplete tasks:
- Move to the common task list – select to clear the Sprint field for the sprint tasks that have not been canceled and move them to the list of project tasks that are not included in sprints.
- Move to a different sprint – select to specify an existing sprint that will include the current sprint tasks. The tasks in the Canceled and Released states will not be moved.
- (if the sprint is in the Active state) Create a new sprint – select to create a new sprint that will include the incomplete tasks of the current sprint.
-
Click Confirm.

When a sprint is canceled:
- The sprint state changes to Canceled.
- The fields of the sprint form become read-only.
- The selected action is applied to the sprint incomplete tasks.
- The value of the Sprint field remains the same for the Canceled tasks and is cleared for the Released tasks.
Manage sprint tasks
The list contains all active tasks except for the Subtasks. The tasks are sorted in ascending order according to the Rank of the upper level tasks.
Example of task sorting
| Task | Rank |
|---|---|
| Defect 1 | 1 |
Epic 1
| 2
|
Epic 2
| 3
|
| User story 1 | 4 |
To open the task preview modal window, click on the right of its number. You can use inline editing in the widget task list.
Use drop-down list in the left upper corner of the page to filter the task list. The list only contains tasks with no sprint specified. The filter criteria are described in the table below:
| Filter | Product development checkbox is selected | Product development checkbox is not selected |
|---|---|---|
| New project tasks | Project tasks in the New state. | Project tasks in the New state. |
| Current project tasks | Project tasks in the Backlog, Development, Review, Testing, and Done states. | Project tasks in the Backlog, Development, Review, Testing, and Done states. |
| Tasks without a project | If the Product development checkbox is selected for the project, the list shows the tasks of all types in the New state if they comply with both of the following criteria:
| If the Product development checkbox is not selected for the project, the list includes General tasks in the New state with empty Project and Product fields. |
| All available tasks | The list includes all tasks that match the New project tasks, Current project tasks, or Tasks without a project filter criteria. | The list includes all tasks that match the New project tasks, Current project tasks, or Tasks without a project filters criteria. |
The tasks are displayed diffrently depending on the Project field values in the parent and child tasks:
- If Epic or Feature is related to the current project, and its child tasks are not, the epic or feature is not displayed in the list.
- If Epic or Feature is not related to the current project, and their child tasks are related to the current project, the epic or feature is dispalyed in the list.
Add tasks to a sprint
To add tasks to a sprint, complete the following steps:
-
Find the required task in the list under the sprints. Use the and icons to hide and show the child tasks. If the task has more than 10 subtasks, the Show more / Hide buttons appear when you unfold the list of child tasks. Use these buttons to show and hide the full child task list.
-
Select the checkbox on the left from the task number. When you select the parent task checkbox, the checkboxes of the child taks are selected automatically. You can also select all tasks on the page by selecting the checkbox in the list header.
noteYou cannot select Epics and Features that do not have child tasks.
-
Click Add to sprint button in the right upper corner of the task list. The button becomes active if at least one General task, User story, Defect, or an Epic / Feature with third level child tasks is selected.
-
Select a sprint in the New or Active state and click Confirm.
Create new task in the Sprint planning widget
To create a new task in the Sprint planning widget, complete the following steps:
- Select an option to create the task:
- Open the action menu of a sprint and click Create task to create a task for the selected sprint.
- Click above the task list to create a task without sprint or add it to any existing sprint.
- If more than one task type is available in the project, specify the new task type in the opened modal window Select task type. If you create the task from the sprint menu, you will only be able to select from the 3rd level tasks available on the project.
- Fill in the fields of the create task modal window. The following fields are filled in automatically:
- Sprint – if you create the task from the sprint action menu.
- Project
- Product – if the Product development checkbox is selected for the project.
- Click Save to create a task in the New state. The new task is dispalyed in the list of available tasks if it matches the selected filter criteria.