Record Extended Model
The Record Extended Model (REM) allows you to extend a set of table colums. The table structure of REM repeats the table structure with tables and columns. Instead of columns, REM uses Attributes (sys_re_attribute). You can connect REM attributes with a table within the Model (sys_re_model). You can also create attribute collections as universal sets of attributes that can be used in several models at the same time.
Use the Record Extended Model (REM) menu category to access the tables related to REM.
REM concept
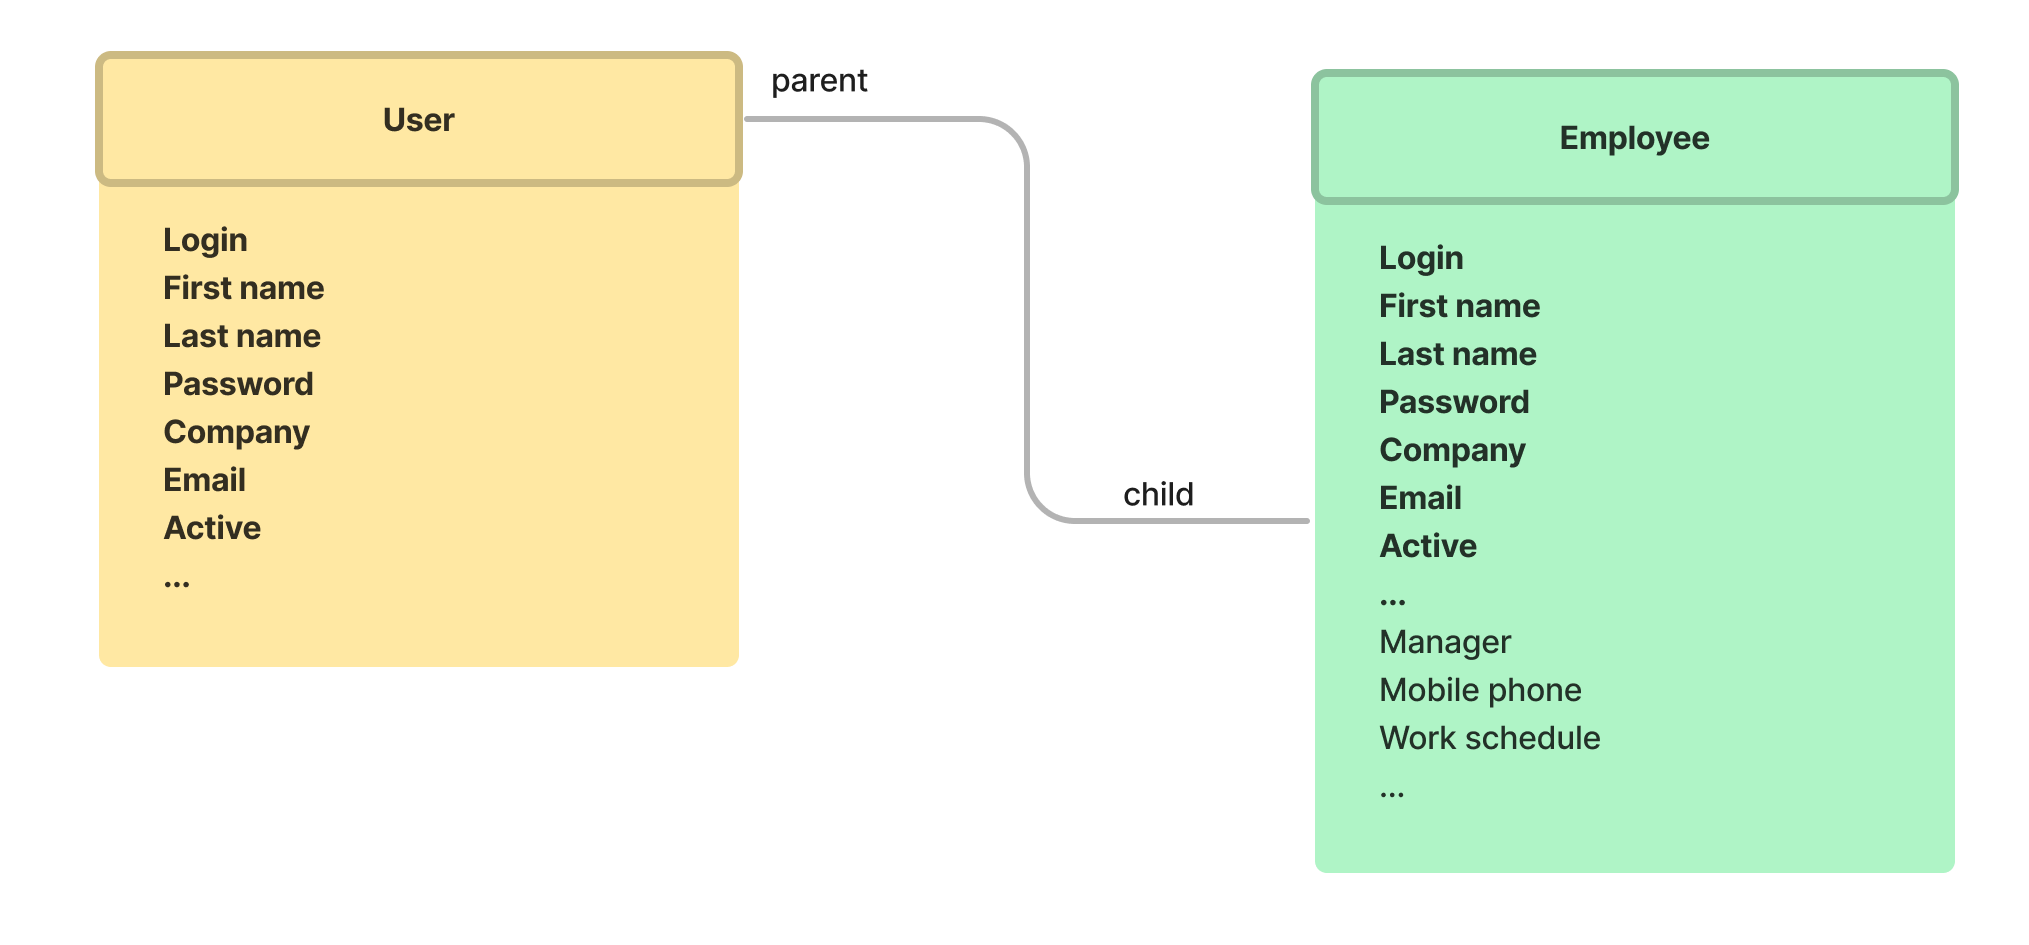
Every table has its own data model specified by the business logic. The data model is represented by the column set. This data model can be extended with child tables containing the same column set as the parent one, and individual attributes inaccessible from the parent table. For example, the diagram below shows that all column of the User table are inherited by the Employee table:
Attributes extension circuit diagram
When few child tables are available, and the column overlap is high, this data model works fine. But when the number of child tables increases, and the column overlap decreases, the management of this data model becomes a challenge. The data model with a large and complicated table inheritance structure has some disadvantages:
- It requires more space for record storage.
- The script execution takes longer.
- It is difficult to configure the functionality related to the specific table, such as data import, layout setting, and other.
The Template Service Catalog is an example of such a table. It consists of a parent table for the catalog and a table record of each request template with specific attributes.
The Record Extended Model (REM) concept addresses the issue described above. The extension concept can be applied to a specific table record, by assigning additional attributes to it.
When a record extension model is applied to a record, it means that an auxiliary record set is created for this record containing information about specific attribute values. Therefore, the record has attributes inherited from a table, and in addition, it has attributes sourced from the extension model.
Configure an extension model
To configure your extension model, you need to:
- Create an extension model.
- Create attributes and link them to the model.
- (optional) Configure the attribute collection.
- (optional) Configure a model client script.
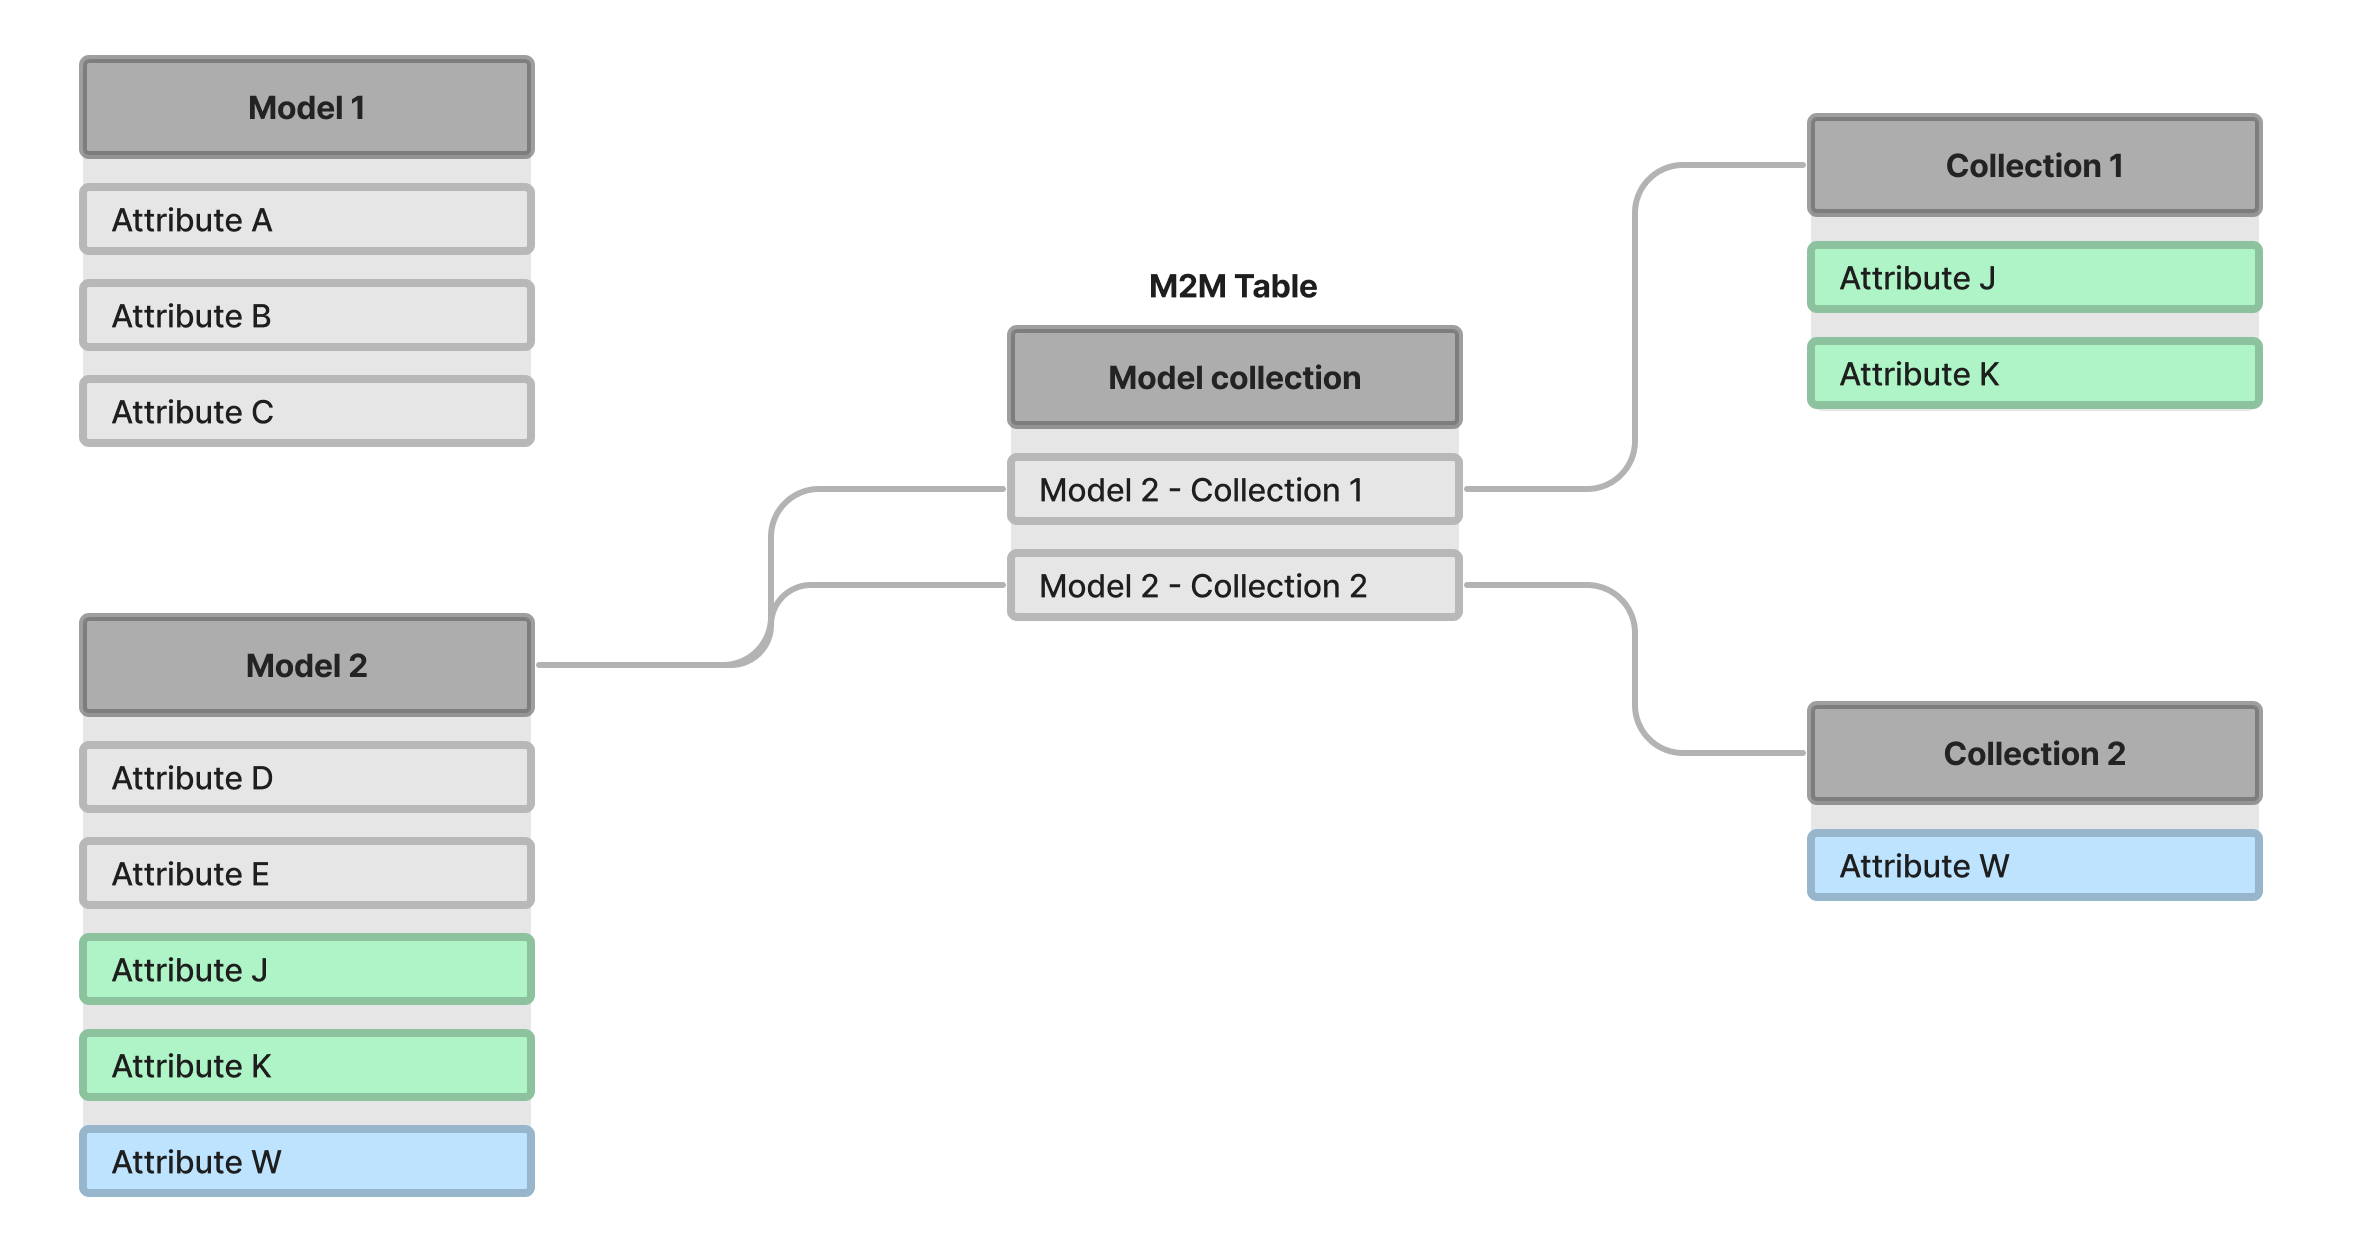
In the diagram below, you can see the difference between models and collections. Models are created with a specific attribute set that can only be used in this model. Collections contain attributes that can be applied to different models.
It is not recommended to create collections with many attributes. It is better to create several collections with one attribute. This approach provides flexibility in model configuration.
Create a model
To create a model, complete the steps below:
- Navigate to Record Extended Model (REM) → Models.
- Click New and fill in the fields.
- Click Save or Save and exit to apply the changes.
Record extended model form fields
| Field | Mandatory | Description |
|---|---|---|
| Title | Y | Specify the model title in any language. |
| Table | Y | Reference to the table affected by the model. Note that after the model is saved the Table field becomes read-only. |
| Description | N | Add a description for the model. |
| After insert script | N | Specify a script that should be executed after a record is created. Develop it using JavaScript extended by the SimpleOne SimpleRecord Server-Side methods. |
| Active | N | Select the checkbox to activate the model. |
| Icon | N | Add an icon to identify the model. |
Related Lists
- Attributes – a list of the attributes linked to this model.
- Model Form Elements – a list of the form elements linked to this model.
- Used Collections – a list of applied collections.
- Model Client Scripts – a list of the model client scripts linked to this model.
- Do not create or add an attribute to a model if an attribute with the same name already exists in this model.
- Do not rename an existing attribute if there is an attribute in the model with the name you need to enter.
Configure an attribute
In SimpleOne, you can create attribute mapping for models and collections. Data mapping is the process of connecting a data field from one table to a data field in another table. It reduces the potential for errors, helps standardize your data, and makes it easier to understand your data because it establishes direct relationships among your data across multiple tables at once.
To create an attribute, complete the steps below:
- Navigate to Record Extended Model (REM) → Attributes.
- Click New and fill in the fields.
- Click Save or Save and exit to apply the changes.
Attribute form fields
- General
- Type Specification
- Default Value
- Reference Qualifier
| Field | Mandatory | Description |
|---|---|---|
| Container | Y | Specify a previously created model. |
| Attribute type | Y | Specify the attribute type. You can use all types except for Date/Time Specific, Record Class, Journal Input and Document ID |
| Title | Y | Specify the attribute title. You can use Latin, Cyrillic letters, [0..9] numbers, and the underscore symbol ( _ ). The Title field can be translated to other languages. |
| Attribute name | Y | Attribute system name. This field is populated automatically. Latin letters, [0..9] numbers, and the underscore symbol ( _ ) are allowed. The field is read-only after the record is saved. |
| Map to column | N | Specify the target field to map the attribute value before the record is inserted (including business rules of the before type). This option allows you to quickly transfer attribute values to fields. You can select columns of the table defined in the model record and columns of its child tables. |
| Comments | N | Add some comments to describe the attribute. |
| Active | N | Select the checkbox to activate the attribute. |
| Read only | N | Select the checkbox to make the field added with this attribute read-only. |
| Mandatory | N | Select the checkbox to make the field added with this attribute mandatory. |
| Full text search | N | Select the checkbox to make it possible to perform a global search on the attribute values. When the checkbox selected, search indices are created for the attribute values. Otherwise, the values of this attribute will not be included in the search. If you clear the checkbox for an existing attribute, the values of which have already been indexed, the indices for the attribute values will be deleted. If you select the checkbox again, the values will be re-indexed. |
| Field | Mandatory | Description |
|---|---|---|
| Dependent on column | Y | Specify a reference column of the desired table. The column should have the table_id name and reference to the Table dictionary to build conditions. The field appears when one of the following options is selected in the Attribute type field:
|
| Maximum length | N | Specify a maximum value length for the attribute value. The value length cannot exceed the allowed length for the specified data type. The field appears when one of the following options is selected in the Attribute type field:
|
| Choice table | N | Specify a table that stores the choice options. The field appears when the Choice option is selected in the Attribute type field. |
| Choice field | Y | Select a column of the Choice table field that contains choice options. The field appears when the Choice table field is populated. |
| Choice type | Y | Define whether the None option is applicable for the field. Available options:
|
| Extra attributes | N | Specify additional configurations for the field. For example, enter the following text to apply the radio buttons style to the choice field: The field appears when one of the following options is selected in the Attribute type field:
|
| Reference | Y | Specify a table with the values you need. The field appears when the List or Reference option is selected in the Attribute type field. |
| On delete | N | Select the action to take when the referenced record is deleted. Available options:
|
When deleting a record A, an update error of a record B can occur if the record has a column that references the record A and the Action on delete for this column is Set NULL.
Unable to update the {link} record because it references to the deleted one
| Field | Mandatory | Description |
|---|---|---|
| Default value | Y/N | Specify the default value that will be populated to the field when creating a record. The field is mandatory when the Choice type is Dropdown without --None-- (specify a default value). |
| Use dynamic default | N | Select the checkbox if you need to generate the default value dynamically. |
| Dynamic default | Y | This field only appears when the Use dynamic default checkbox is selected. Select the script from the Dynamic Default Values (sys_default_value_dynamic) table, so its execution result will be automatically calculated and entered into this field; this value will be the default value for the column specified.
|
| Field | Mandatory | Description |
|---|---|---|
| Reference qualifier type | N | Specify the type of the reference qualifier. Available options:
|
| Reference qualifier condition | N | Configure filters using the condition builder. The field appears when the Simple option is selected in the Reference qualifier type field. |
| Dynamic reference qualifier | N | Select the dynamic reference qualifier from the list. The field appears when the Dynamic option is selected in the Reference qualifier type field. |
| Reference qualifier fixed | N | Select the checkbox to fix filters in breadcrumbs. This functionality blocks the use of the condition builder. The field appears when one of the following options is selected in the Attribute type field:
|
Configure an attribute collection
Attribute collections are implemented to use Many-to-Many Relationships, so they allow you to reuse the same attributes across models instead of adding them separately to each model.
It is not recommended to create collections with many attributes. It is better to create several collections with one attribute. This approach provides flexibility in model configuration.
To use it, complete the following steps:
- Create a collection record as described below.
- Fill it with previously created attributes or create new ones using the Attributes related list.
- Relate this collection with previously created models using the Used in Models related list.
After that, all the attributes contained in this collection are used by all models this collection relates to.
- If you need to use attribute mapping in a collection, you need to specify a target table in the Table field of a collection. Otherwise, leave the Table field empty.
- Collections with the populated Table field can only be added to models with the same table specified, or to models of its child tables.
To create a collection, complete the steps below:
- Navigate to Record Extended Model (REM) → Collection.
- Click New and fill in the fields.
- Click Save or Save and exit to apply the changes.
Collection form fields
| Field | Mandatory | Description |
|---|---|---|
| Title | Y | Specify the collection title. |
| Active | N | Select the checkbox to activate the collection. |
| Table | N | Specify the table to which the collection is related. |
Related Lists
- Attributes – create an attribute related to this collection or select an existing one from the table.
- Form Elements – create a form element related to this collection or select an existing one from the table.
- Used in Models – create a model related to this collection or select an existing one from the table.
- Client Scripts – create a model client script related to this collection or select an existing one from the table.
- Do not rename an existing attribute in the collection if there is an attribute in the model or in the collection linked to the model with the name you want to enter.
- The same collection and model cannot be linked to each other more than once.
- A model and a collection that have at least one of the same name attribute matching the model attribute cannot be bound between each other.
Configure a model client script
To create a record extended model client script, complete the steps below:
- Navigate to Record Extended Model (REM) → Model Client Scripts.
- Click New and fill in the fields.
- Click Save or Save and exit to apply the changes.
Model Client Script form fields
| Field | Mandatory | Description |
|---|---|---|
| Name | Y | Define the client script name. |
| Container | Y | Reference to the model or collection. |
| Type | Y | Specify the script type. Available options:
|
| Attribute | Y | Specify a previously created model attribute. This field is mandatory when the onChange script type is selected. |
| Description | N | Add a description of the client script. |
| Active | N | Select the checkbox to activate the script. |
| Order | N | Specify the client script execution order. Scripts are executed in ascending order. |
| Script | N | Specify the client script. Use the methods of the SimpleForm class in the script. If the model is displayed using the <rem> SimpleTag, then the s_form object will match the parent form that has the widget. When using the <remform> SimpleTag, the s_form object will be the form displayed by the tag. |
| Script | N | Specify the client script. Use the methods of the SimpleForm class in the script. If the model is displayed using the <rem> SimpleTag, then the s_form object will match the parent form that has the widget. When using the <remform> SimpleTag, the s_form object will be the form displayed by the tag. |
| Script | N | Specify the client script. Use the methods of the SimpleForm class in the script. If the model is displayed using the <rem> SimpleTag and refers to the same table, then the s_form object will match the parent form that uses the widget. If on the page with a record form for one table there is an RE model of a record of another table, which is added to the form using a widget with the SimpleTag <rem>, or an RE model is displayed using the <remform> tag, the model client script cannot directly access the main record form through an s_form variable. In this case, there are two independent form objects on the page. To operate the main record form, use the construction s_widgets.getForm('formName'), where formName is the name of the view. |
Configure model or collection form elements
You can only add one extended model to a record form. If you add more, the form will not function correctly.
You can arrange the fields of your model or collection attributes in a particular order and position, as you can do with the form layouts.
You can configure the position of the collection from the Model Form Elements related list of the Model form. But to configure the position of the attributes withing the collection, go to the Model Form Elements related list of the Collection form.
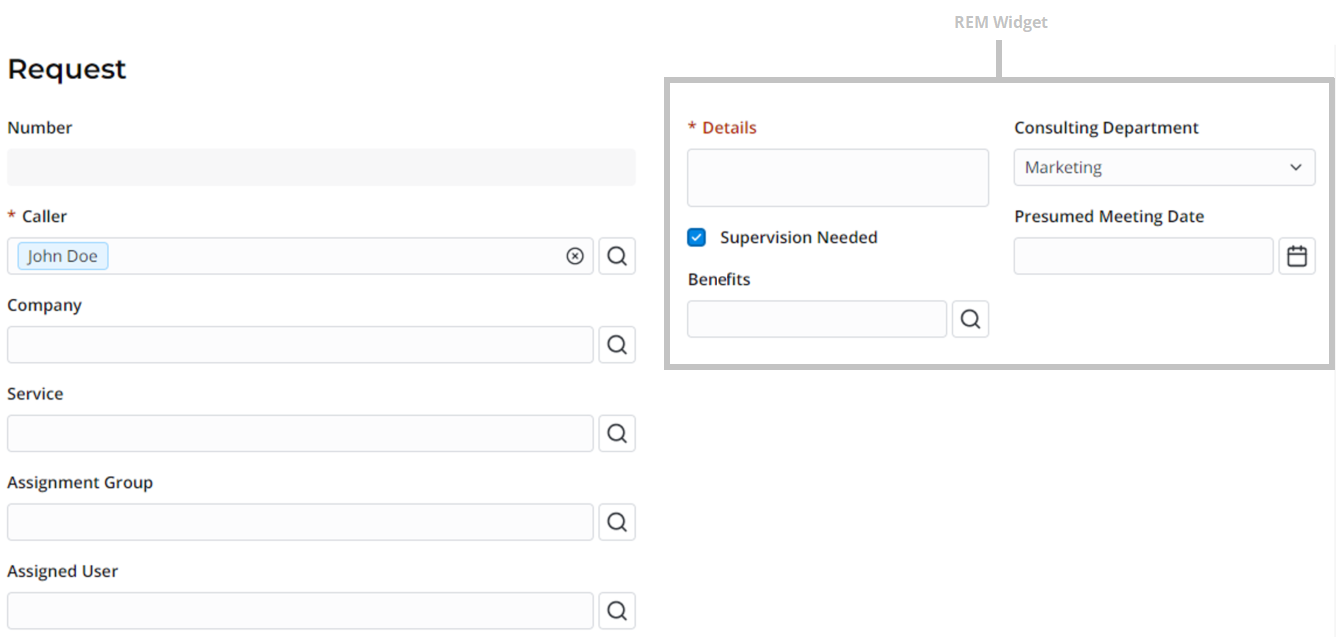
Group attributes by common features and give them a title. In the screenshot below, custom model attributes are divided into two columns:
If you need to define a title for a group of attributes organized in one block, use the Begin element.
The title will appear on the relevant page of the Self-Service Portal.
To change the order of the displayed attributes, perform the following steps:
- Navigate to Record Extended Model (REM) → Models or Record Extended Model (REM) → Collections, depending on what you need to configure.
- Open the model or collection you need.
- In the Related Lists area, select the Model Form Elements tab.
- Arrange the attributes by changing the value in the Position field. The attributes are displayed on the form in the ascending order.
Use the inline editing: double-click the cell in the Position column, enter the value, and press Enter to save the changes.

To add new elements to the model or collection layout (such as splits), perform the following steps:
- Navigate to Record Extended Model (REM) → Models or Record Extended Model (REM) → Collections, depending on what you need to configure.
- Open the model or collection you need.
- Click New and fill in the fields.
- Click Save or Save and exit to apply the changes.
Model Form Element form fields
| Field | Mandatory | Description |
|---|---|---|
| Container | Y | Specify a previously created model or collection. If the element is created from the related list, the field is populated automatically. |
| Position | Y | Define the order of the element on the form. The elements are displayed on the form in the ascending order. |
| Block element | Y | Specify the type of the element. Available options:
|
| Block title | N | Specify the title of the group of fields. The title is displayed above the attributes group on the relevant page of the Self-Service Portal. This field appears when the Block element value is Begin. |