Custom Activities
If the default set of the workflow activities does not suit your needs, you can create a custom activity with the specific logic via the SimpleOne agent interface.
Role required: admin, wf_admin.
To create a new activity, complete the following steps:
- Create a table that stores the settings of the newly created activity.
- Create an activity type that stores the parameters and has the functionality of the created activity.
- Create activity exit types that specify the exit condition for the activity.
- Configure the activity form view that is displayed in the Workflow Editor.
Create a table
In fact, every activity stores its settings in a child table of the Workflow Activity (wf_activity) table.
To create this child table, complete the steps below:
- Navigate to System Settings → All Tables.
- Click New and fill in the fields.
- In the Parent field, select the Workflow Activity (wf_activity) table.
- Click Save or Save and exit to apply the changes.
See the Create Tables article to learn more.
Create an activity type
An activity type is an entity intended to classify the newly created or updated activities. Use it to define properties and behavior for an activity.
To create an activity type, complete the steps below:
- Navigate to Workflow → Activity Type.
- Click New and fill in the fields.
- Click Save or Save and exit to apply the changes.
Activity type form fields
| Field | Mandatory | Description |
|---|---|---|
| Name | N | Specify the activity type name (for example, "Send Request"). |
| Active | N | Select this checkbox to activate this activity type. If you clear this checkbox, then you will not be able to use this activity type when creating or modifying activities. |
| Description | N | Add a brief description of the activity type. |
| Script | N | Specify a script that implements the activity logic. Use SimpleOne Server-Side API there. |
| Image | N | Attach an image to be displayed in the workflow editor for this activity. It is recommended to use SVG files with a height and width of 24 px. Other image formats are also supported.  |
| Activity type category | N | Specify a category for the activity. |
| Activity table | N | Specify the previously created table for this activity type. |
| When to run | N | Specify a condition that should be met to run the activity type. Available options:
|
Create an activity type exit
To create an activity type exit, complete the steps below:
- Navigate to Workflow → Activity Type Exits.
- Click New and fill in the fields.
- Select the activity type for which you create the exit in the Activity type field.
- Click Save or Save and exit to apply the changes.
Workflow activity type exit form fields
| Field | Mandatory | Description |
|---|---|---|
| Name | N | Specify the activity type exit name. |
| Activity type | N | Specify the activity type to which this exit is related. |
| Exit condition | N | Specify a script that defines the condition to be met to exit the activity. The script returns the true or false value. Example: activity.result == 'complete' |
| Description | N | Add a description of the activity type exit. |
| Order | N | Specify the order of the exit. If the activity type has multiple exits, they are arranged in the activity block in ascending order depending on the value of this field. |
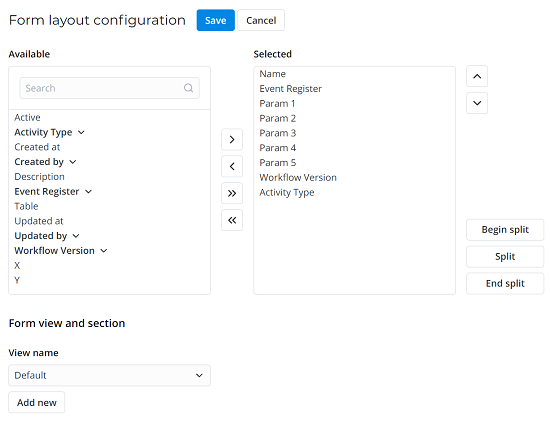
Configure the activity form layout
It is not recommended to change the form layout for the "out-of-the-box" activities. This may cause problems when adding these activities to a workflow.
To configure the activity form view displayed in the Workflow Editor, perform the following steps:
-
Open the record of the table you have created for the new activity.
-
Copy the value from the Name field and paste it in the URL address after the /record/ line (see the example below).

-
In the burger menu , navigate to Configure → Form → Layout.
-
In the Form view and section area, click Add new under the View name field.
-
In the window that appeared, enter "Workflow" in the View name field.
-
Click Create to apply the changes.
-
Configure the set of fields to display on the activity form.
-
Click Save to apply the changes.
In case you need to see the activity record often, create a menu item:
- Open the record of the table you have created for the new activity.
- Copy the value from the Name field and paste it in the URL address after the /record/ line (see the example above).
- Copy the URL address.
- Navigate to System Settings → Menu Items.
- Click New and fill in the fields.
- In the Link type tab, fill in the Table and Link type fields with any values.
- In the Link type tab, click the icon and paste the URL.
- Click Save or Save and exit to apply the changes.
See the Panels and Navigation article to learn more about menu items and categories.