Quick Responses
Quick responses are intended for ITSM agents for processing tickets. Customized quick responses allow agents to communicate with callers through the most frequently recurring issues with the least amount of effort.
Before creating a quick response
Before creating quick responses for certain tables, put a widget with quick responses on the table record form view. To do so, complete the following steps:
- Open the record form you need.
- Navigate to Configure → Form → Layout.
- Move the Activity Feed with Quick Responses widget from the Available to the Selected box.
- Click Save.
If there is an Activity Feed widget on the form view, replace it with a widget with add-ons to use quick responses.
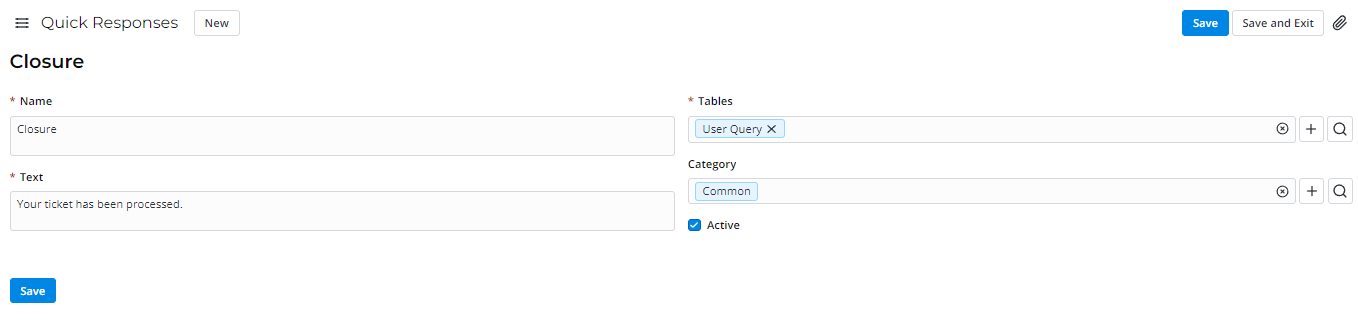
Create a quick response
To create a quick response template for agents to use when processing tickets, complete the following steps:
- Navigate to Quick Responses → All Responses.
- Click New and fill in the fields.
- Click Save or Save and exit to apply the changes.
Quick Response form fields
| Field | Mandatory | Description |
|---|---|---|
| Name | Y | Specify the quick response name. |
| Text | Y | Add the response text. You can use variables, for example, ${caller}. |
| Tables | Y | Specify the tables for which this quick response template is available. |
| Category | N | Specify the category that the response belongs to. |
| Active | N | Select the checkbox to activate the response record. |
Create a response category
Categories are used for classifying quick responses. To create a category, complete the following steps:
- Navigate to Quick Responses → Categories.
- Click New and fill in the Name field with the category name to combine similar responses.
- Click Save or Save and exit to apply the changes.
Display quick responses in Activity feed
After creating and activating quick response records, users can use them on record forms.
Quick responses are displayed on the Activity Feed widget of forms. To apply the quick response you created, complete the following steps:
- In the Activity Feed, select the necessary tab.
- Click in the upper right corner of the Activity Feed.
- In the window that appears, select the category and find the quick response you need. Alternatively, you can use the search bar.
- Click the name of the response.
- The field is automatically filled in with the quick response text.
- Click or use the keyboard shortcut Ctrl + Enter to send a reply.
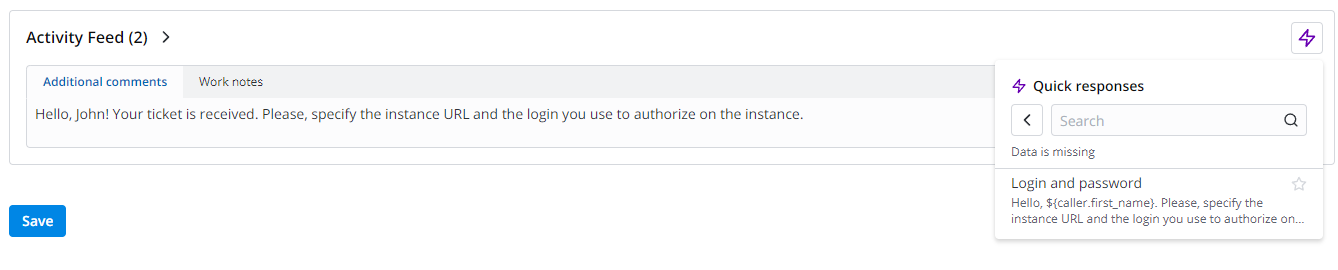
The action in the Activity Feed is available for the tables that have at least one quick response created for them.
You can add quick responses to your favorites. To do so, click on the right of the response. All favorite responses can be found in Quick Responses → Favorites.
Add Quick Responses to the form fields
You can create quick responses and their categories to apply them to the fields of type Text in the ITSM task forms. For example, use them with the Closure notes field in the Incident form.
To place the widget in the form, do the following:
-
Open the record of the necessary table.
-
In the burger menu , go to Configure → Form → Layout.
-
Drag the Quick Responses widget to the Selected area and, for your convenience, place it above the field that quick responses must be applied to. The widget location does not affect its functionality.
-
Click the gear icon to open the Configure the value of the widget options modal window. Ensure the targetField value is the field name that the quick responses must be applied to. For example, {"targetField":"closure_notes"}.
cautionThe widget is not displayed if the target field name is not specified in the widget options or if the field specified is not located on the form.
-
Click Save to apply the changes.
As a result, the widget icon appears on the right of the specified field. Click it to select and paste a quick response.