Project Boards
Project task boards are necessary for the management of team workflow. The boards visually represent the current state of the project: the tasks are divided into columns, each showing a list of the tasks in one state.
A board of the corresponding type (Scrum or Kanban) is automatically added for each project. The board is also automatically deleted if the related project is deleted. The values of the Board form fields cannot be changed. There are two ways to open a project board:
- Navigate to SDLC → General Settings → Project Boards, open the required Board form and click the Open board button.
Role required: pda_admin.
- Navigate to SDLC → Projects → All Projects / My Projects, open the required Board form and click the Open board button. To return to the board form, click .
Role required: pda_user, pda_admin.
:::
The board title and a badge with the approach used on the project (Scrum or Kanban) are displayed in the board header. You can configure the board structure in the related lists of the Board form. Read more in the Configure Board Elements article.
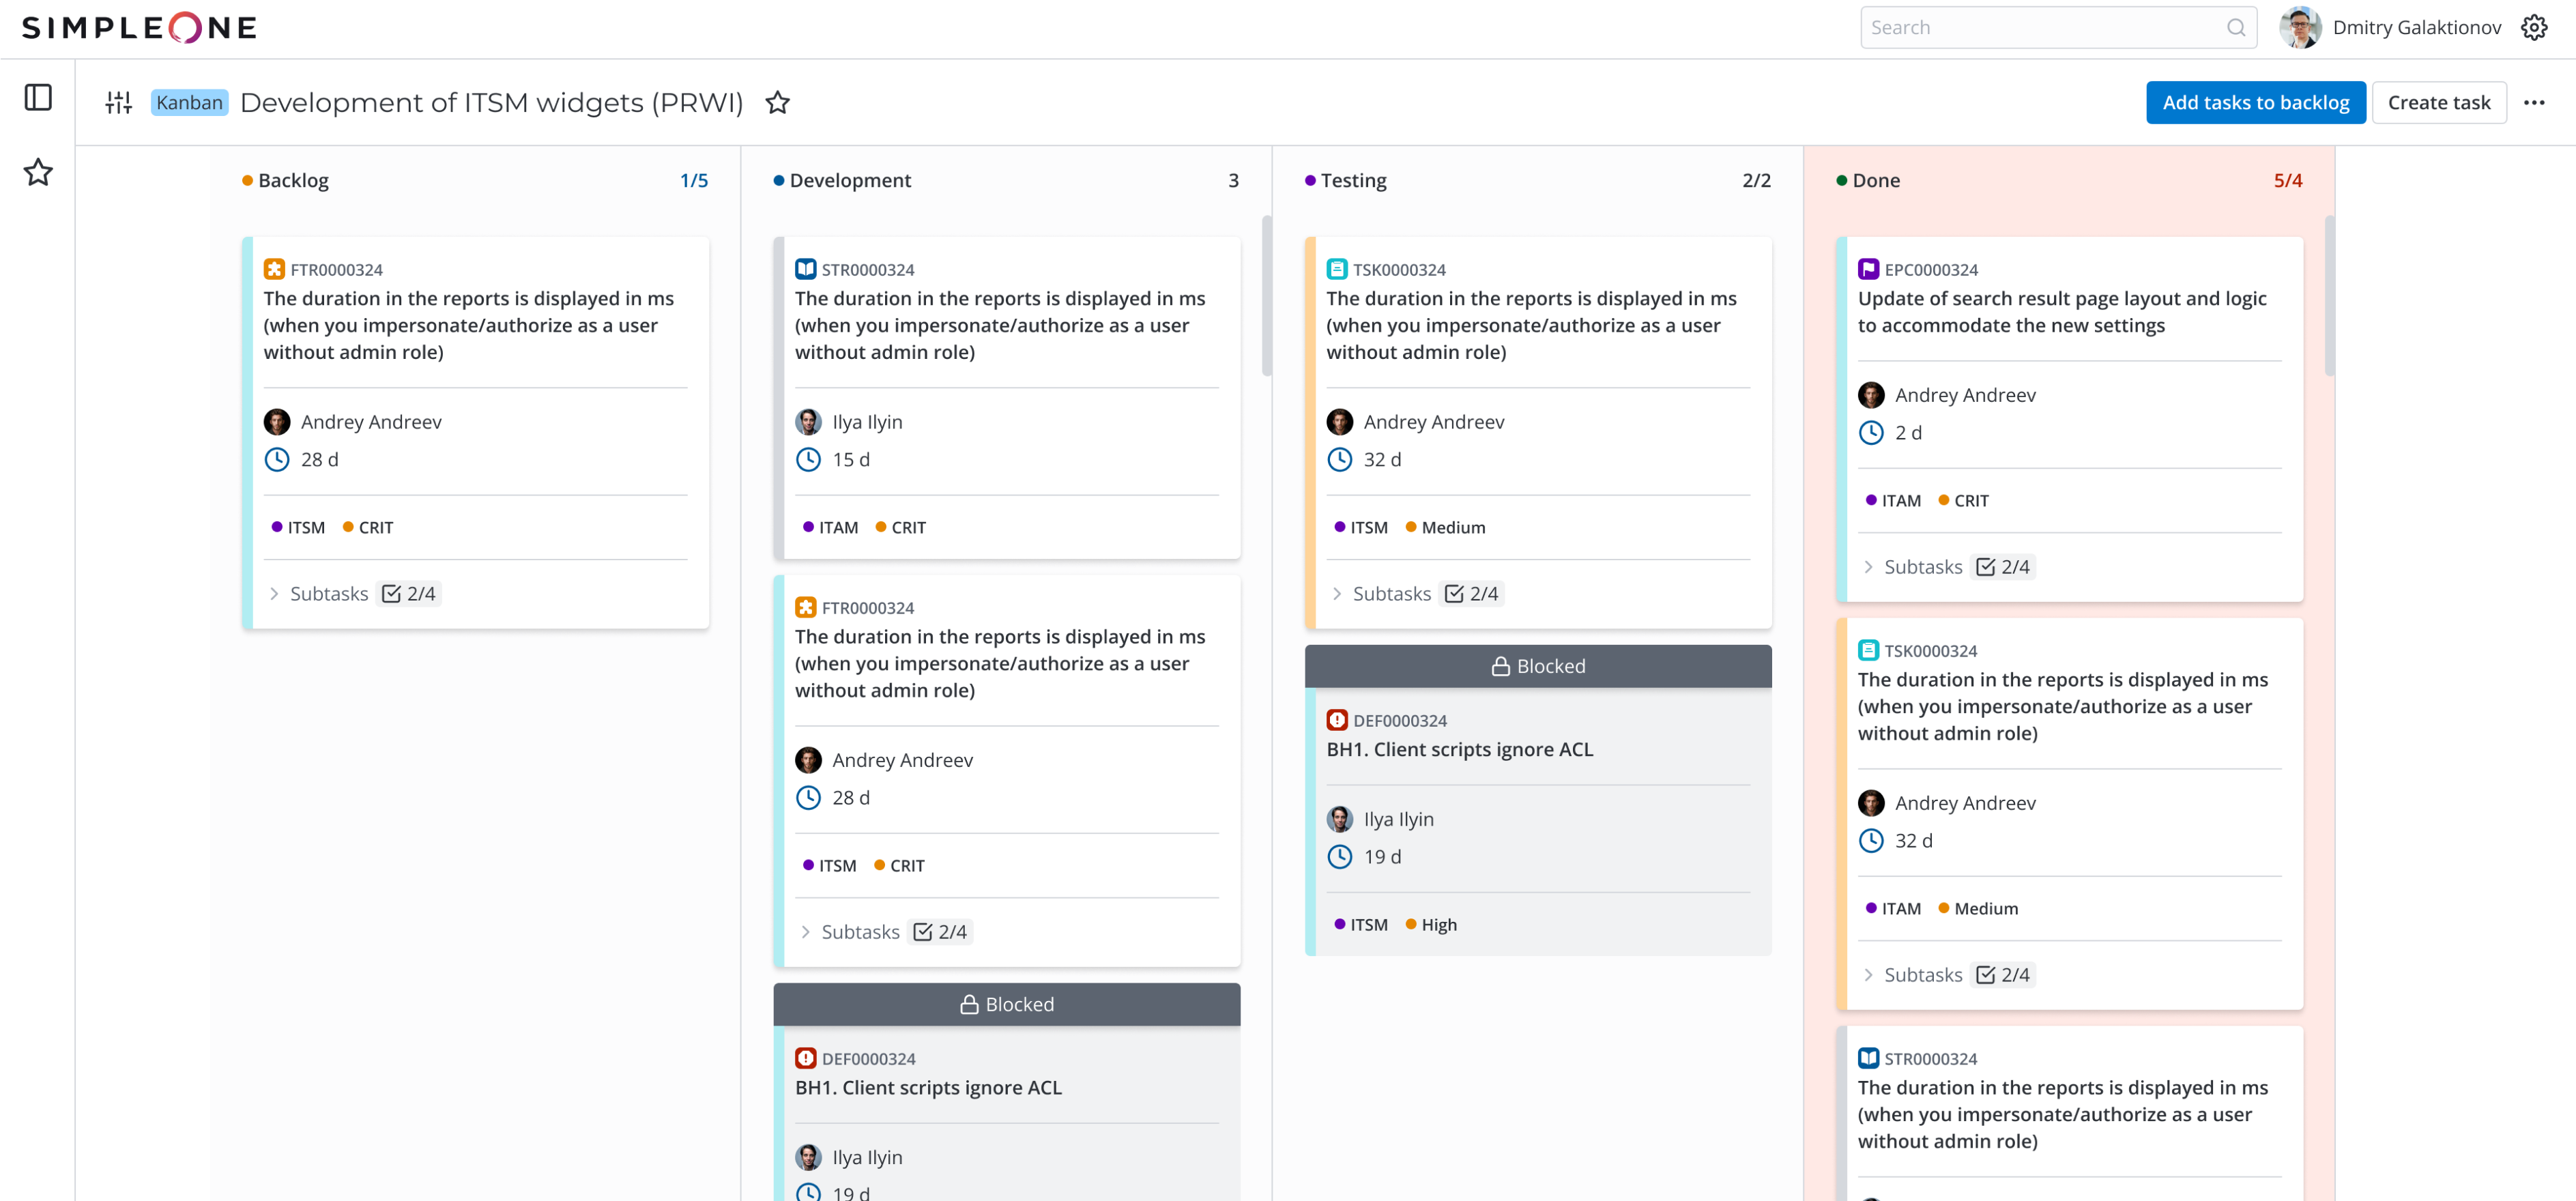
SDLC Kanban boards
WIP limit is one of major distinguishing features of Kanban boards. It is a limitation to the number of tasks in each state. Read more about the configuration of WIP limits in the Configure Board Elements article.
Kanban board elements
Read more in the Configure Board Elements article.
Manage Kanban board

UI actions available on a Kanban board:
- – click to open the board form where you can configure the board structure in the related lists.
- – click to add the board to Favorites.
- Add tasks to backlog – click to open the Add tasks to backlog widget where you can select the new project tasks to be added to the Backlog column, or create a task. If you exceed the WIP limit when you add tasks to backlog, a corresponding warning is displayed.
- Create task – click to create a new task for the project. You can only select from the task types available on the project. The fields Project and Product (if Product development checkbox is selected for the project) are filled in automatically. The New state is assigned to the task when the record is saved and the task is added to the corresponding column.
Role requried for actions Add tasks to backlog, Create task: pda_admin, pda_user if they are a team leader on the project or the owner of the product/product module selected at the project creation.
Click three dots in the right upper corner of the board to open the action menu with the following options:
- Compact view / Detailed view – click to change the board view. In the compact view, the cards are minimized. This mode is more suitable for smaller screens, or when there are many columns on the board. The card width is decreased in the compact view, the list of subtasks cannot be unfolded and the initials of the responsible employee are displayed instead of their full name.
- Open tasks in list – click to open the list of all board tasks in a new tab. The tasks are grouped by states. The tasks in the states corresponding to the inactive columns are hidden.
- Copy board link – click to copy the link to the board.
- Collapse all swimlanes – click to collapse all swimlanes of the board.
- Expand all swimlanes – click to expand all swimlanes of the board.
SDLC Scrum boards
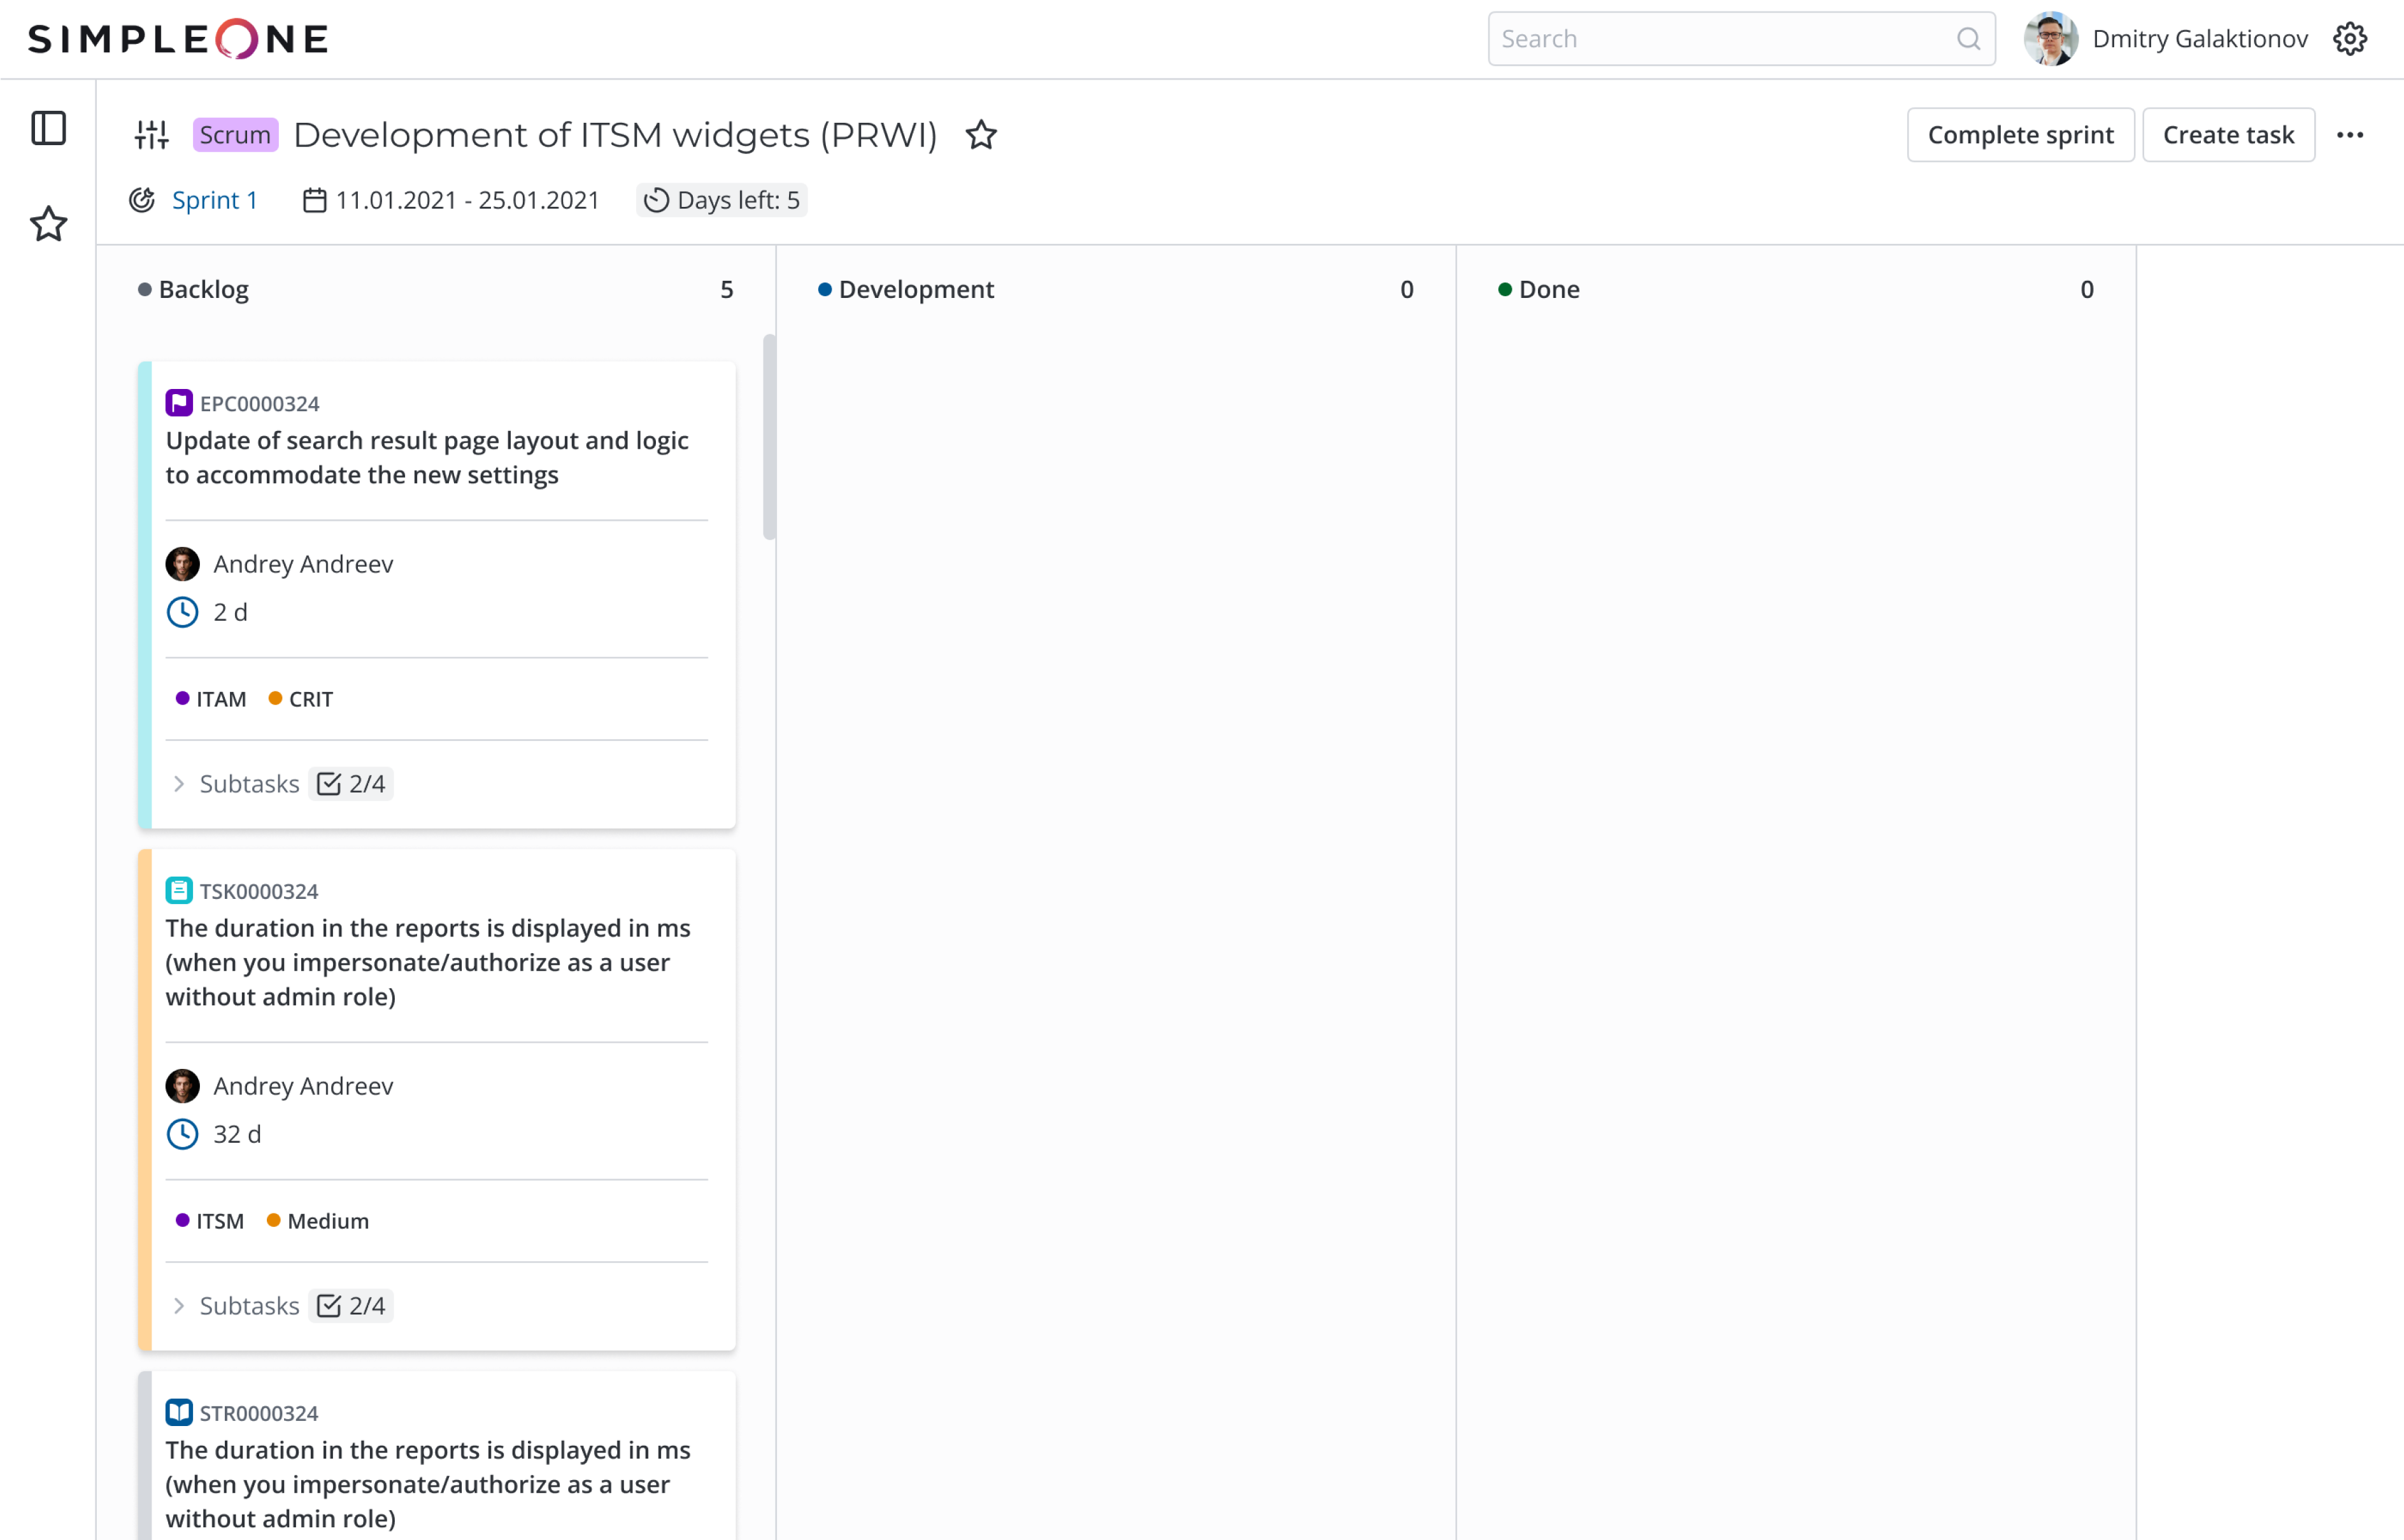
Only the active sprint tasks are displayed on the board. The board is empty if there is no active sprint. You can add tasks to sprints in the Sprint planning widget or on the board.
Scrum board elements
Read more in the Configure Board Elements.
Manage Scrum board

The active sprint title, start date, end date, and the number of days remaining till the end of the sprint are displayed under the board title. If the sprint is expired, a corresponding warning is displayed on the board.
UI actions available on a Scrum board:
- – click to open the board form where you can configure the board structure in the related lists.
- – click to add the board to Favorites.
- Запустить спринт – кнопка отображается только если нет активного спринта. Нажмите, чтобы открыть виджет Планирование спринтов, где вы сможет запустить спринт.
- Start sprint – the button is displayed only if there is no active sprint at the moment. Click to open the Sprint planning widget where you can start a sprint.
- Complete sprint – the button is displayed only if there is an active sprint at the moment. Click to open the modal window Complete sprint where you can select action for incomplete tasks, specify the related release and confirm the sprint completion.
- Create task – the button is displayed only if there is an active sprint at the moment. Click to create a new task for the project. You can only select from the task types available on the project. The fields Sprint, Project, and Product (if the Product development checkbox is selected for the project) are filled in automatically. The task is added to the left-most column after the creation. If there are no active columns, the task is assigned with the New state.
Role requried for actions Start sprint, Complete sprint, Create task: pda_admin, pda_user if they are a team leader on the project or the owner of the product/module selected at the project creation.
Click three dots in the right upper corner of the board to open the action menu with the following options:
- Compact view / Detailed view – click to change the board view. In the compact view, the cards are minimized. This mode is more suitable for smaller screens or when there are many columns on the board. The card width is decreased in the compact view, the list of subtasks cannot be unfolded and the initials of the responsible employee are displayed instead of their full name.
- Copy board link – click to copy the link to the board.
- Sprint planning – the option is only displayed if there is an active sprint. Click to open the Sprint planning widget where you can manage the sprint tasks.
Role required: pda_admin, pda_user if they are a team leader on the project or the owner of the product/module selected at the project creation.
Board cards
There is a card on the board for each task. It contains major information about the task. The card interface depends on:
- the board settings: whether the badges, color markers and additional attributes.
- the card parameters: task type, whether the responsible is specified.
The cards are placed in the columns that correspond with their current state. The order of cards from top to bottom is defined by the task Rank.
Only the tasks with types General task, Defect, User story are displayed on the board if these types are used on the project.
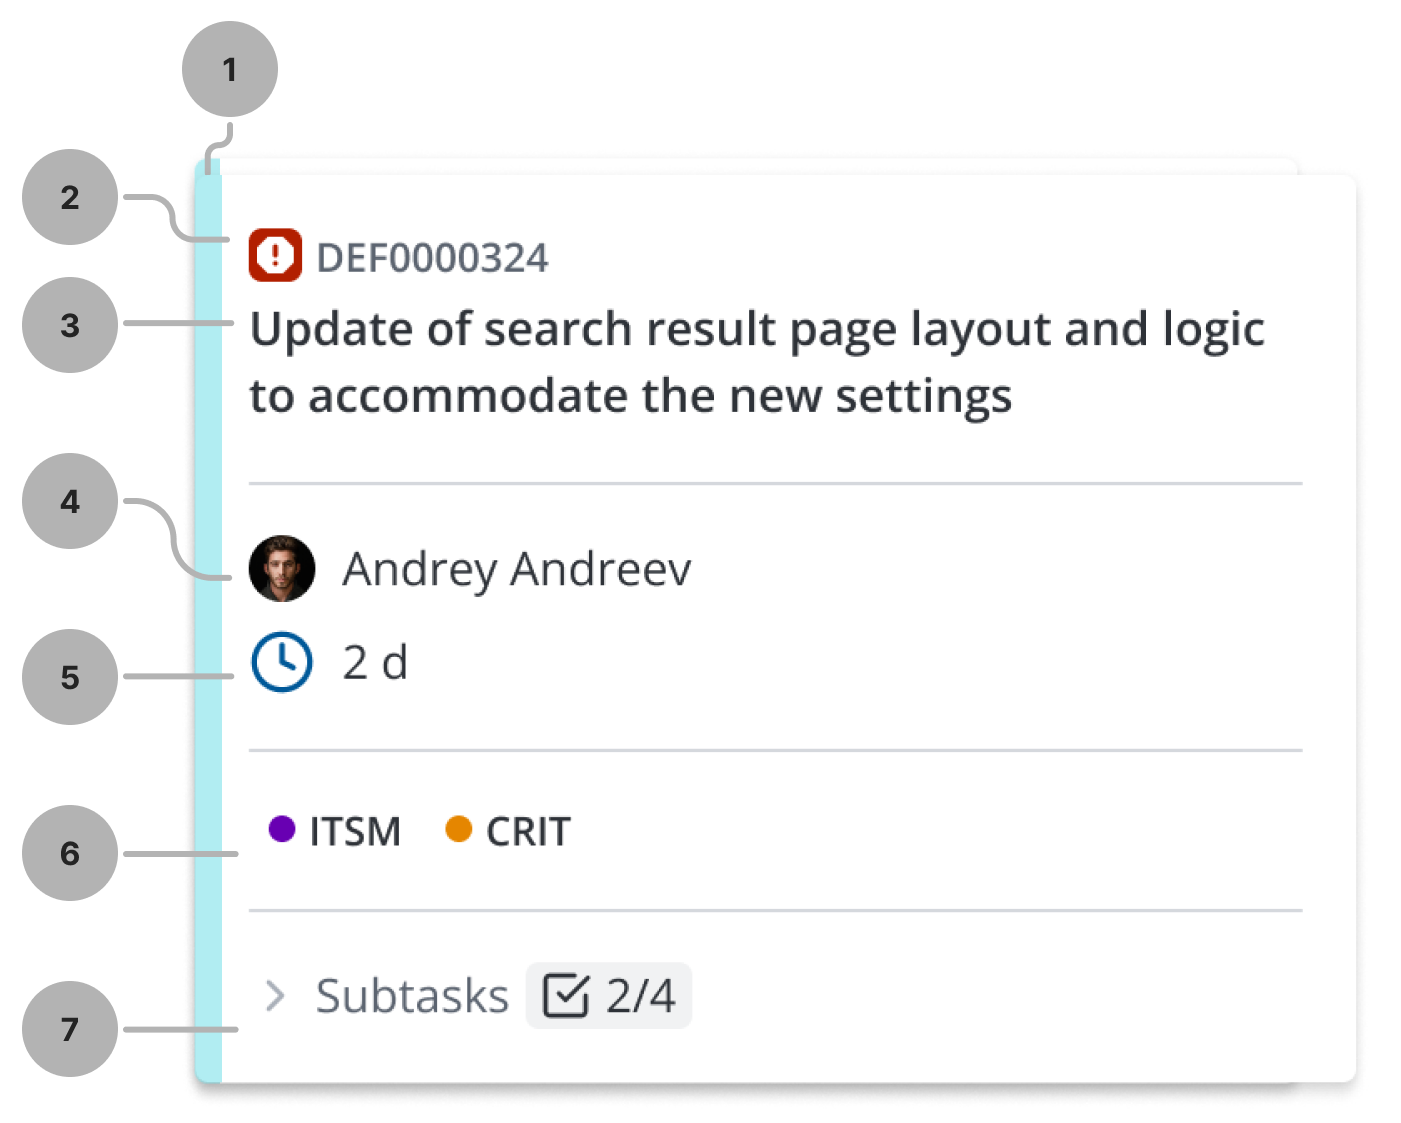
Card interface:

- Color marker.
- The icon of the corresponding task type from the table Task type (pda_task_type) and the task number.
- Task name.
- The employee responsible for the task. The avatar, first name, and second name are displayed on the card.
- The number of days since the last change of the State field value for the record.
- Badges.
- Subtasks drop-down list that is collapsed by default. The tasks in the Ready state are marked with a selected checkbox icon.
Actions available for the cards:
-
Block task – if the card is not blocked, a lock icon is displayed when you move the pointer over the card. Click it to open the Block the task modal window where you need to specify the block reason. The block reason is added to the Activity Feed on the task form as a work note. The blocked tasks cannot be dragged between the columns.
-
Unblock task – if the card is blocked, a lock icon is displayed with the Card blocked text. Click Card blocked to open the Unblock the task modal window. If you unblock the task, you will be able to change the card state on the board.
-
Drag – drag the cards between columns holding the left mouse key on the card. You can only drag unblocked cards.
-
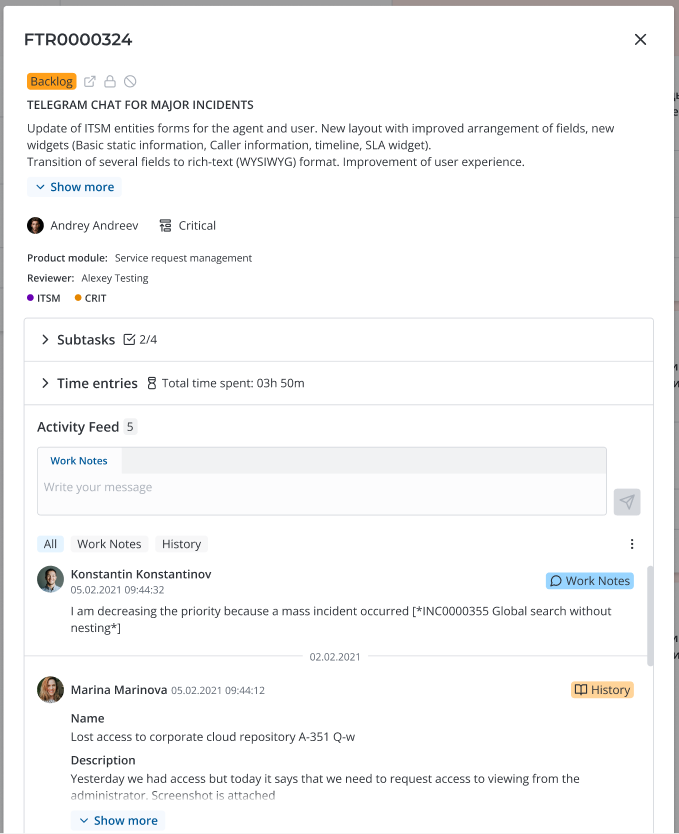
Preview – click the card to open the task preview modal window where you can:
- open the task form in a new tab
- block / unblock the task
- cancel the task
- see detailed information about the task (description, priority, work notes)
- edit the task name, description, responsible and priority
- add a work note
- add a time entry
