CRM Information
The CRM Information widget is used on the forms of the CRM application to display crucial information about the record in the agent interface. The widget saves the user time and helps to easily view the important information without searching for it among the form fields.
Adding widget to a form is described in detail in the article of the same title. By default, the widget is available on the forms of the following tables:
- Certificate (crm_contact_certificate)
- Action (crm_action)
- Customer Contact (crm_customer_contact)
- Customer Company (crm_customer_company)
- Opportunity (crm_opportunity)
- Sales Direction (crm_selling_direction)
- Lead (crm_leads)
- Marketing List (crm_marketing_list)
- Marketing Campaign (crm_marketing_campaign)
Widget appearance
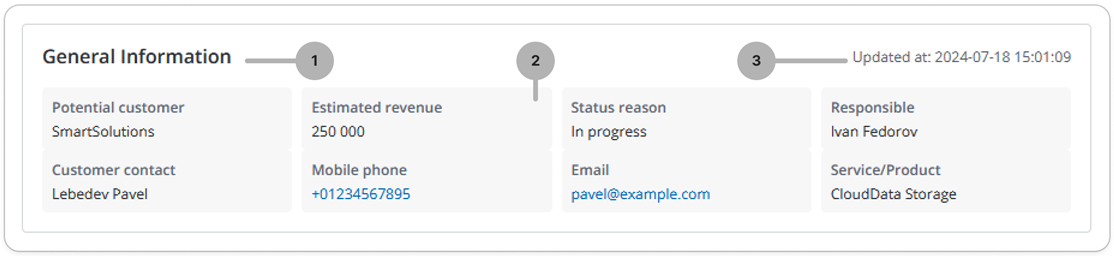
- Widget title. You can change it by editing the translations of the /record/source_message/157495693602756092 source message.
- Widget fields. You can define their structure and order in the widget schema options. Read more in Configure the widget fields.
- Date and time of latest record update.
Configure the widget fields
The fields displayed in the CRM Information widget are organized into rows and columns. The rows can have different number of columns. Each row, regardless of the number of the columns it has, takes the full width of the widget.
To change the displayed fields and their layout, complete the following steps:
-
In the burger menu of the form where the widget is located, go to Configure → Form → Layout.
-
In the Selected box, select the widget you need to configure. Click the icon to the right of the widget title. This opens a window where you can configure the widget schema option values.
-
Specify the system names of columns you need to include in the widget in the Configure the value of the widget options modal window that opens. Use the following format:
Schema option values{
[
["potential_customer", "estimated_revenue", "status_reason", "responsible"],
["customer_contact", "customer_contact.phone", "customer_contact.email", "service_or_product"]
]
} -
Click Save.
As a result, the widget has:
- four columns in the first row with the Potential customer, Estimated revenue, Status reason, and Responsible fields.
- four columns in the second row with the Customer contact, Mobile phone, Email, and Service/Product fields.