Tree Structure
The tree structure allows you to manage nested hierarchical structures of items, such as the portal header menu and cards. This functionality is intended to reduce work efforts spent on the portal structure configuration. The nested portal items can be managed through a special tree-like structure, making this process easier and more effective.
Use the tree structure to create a node hierarchy with any predefined nesting level that allows to implement the navigation structure on a portal.
It is recommended to recreate portal elements (headers and cards) using the tree structure if you are using the customized ones. Otherwise, the errors may occur in the portal header or cards functionality.
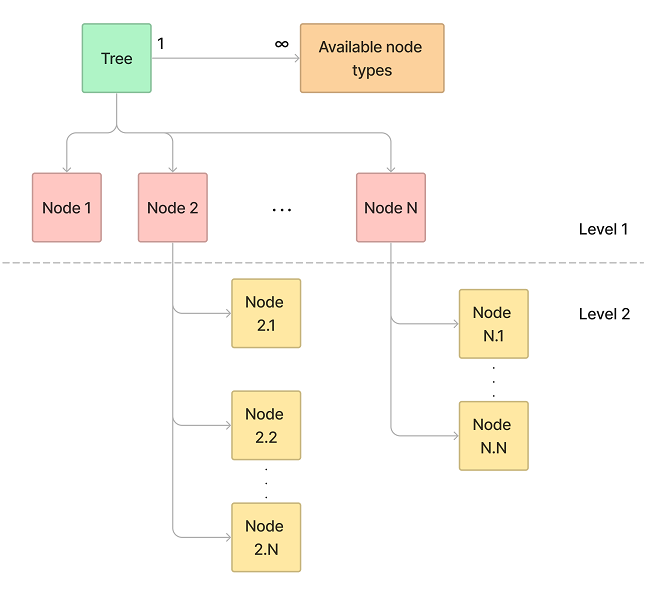
A scheme below illustrates the functionality work principles:
Configure a tree structure
To configure a tree structure from scratch, follow the steps below:
- Configure a node type.
- Create a tree.
- Create a node itself and configure its attributes.
Create a node type
To create a node type, complete the steps below:
- Navigate to Tree Structures → Node Types.
- Click New and fill in the fields.
- Click Save or Save and exit to apply the changes.
Node Type form fields
| Field | Mandatory | Description |
|---|---|---|
| Name | Y | Specify a node type name (for example, "Portal Card"). |
| RE Model | N | Specify a record extension model that sets up the final object view and behavior. |
| Need URL | N | Select this checkbox to define that all objects using this node type will require the URL specification. |
Create a tree
To create a tree, complete the steps below:
- Navigate to Tree Structures → Trees.
- Click New and fill in the fields.
- Click Save or Save and exit to apply the changes.
Tree form fields
| Field | Mandatory | Description |
|---|---|---|
| Name | Y | Specify a descriptive tree name. |
| Available node type | Y | Select node types to use within this structure from the Node Types dictionary. You can select more than one item. |
| Maximum nesting level | Y | Specify an integer number responsible for the hierarchy maximum level. |
| Active | N | Select this checkbox to activate a tree record. |
Create a node
To create a node, complete the steps below:
- Navigate to Tree Structures → Trees.
- Open a tree record for which you need to create a node.
- In the Related Lists area, select the Simple Node tab.
- Click New and fill in the fields.
- Click Save or Save and exit to apply the changes.
To create a node from scratch, complete the steps below:
- Navigate to Tree Structures → Nodes.
- Click New and fill in the fields.
- Click Save or Save and exit to apply the changes.
Node form fields
- Main form
- General
- Extra attributes
| Field | Mandatory | Description |
|---|---|---|
| Title | Y | Specify the node title. This field can be populated in any language supported by the platform. |
| Tree | Y | Select a previously created tree containing information about the structure. Fill in this field, so the General tab with the tree attributes appears. |
| Active | N | Select this checkbox to activate the node. |
| Order | Y | Enter a number to define the node order. The nodes are sorted in ascending order. |
| Field | Mandatory | Description |
|---|---|---|
| Access criteria | N | Specify the user criteria defining user access to this node (a card or a header element). If no criteria are selected, all users are allowed to use this element and its sub-elements as long as they are not protected by the separate criteria. |
| Node type | N | Specify a node type by choosing from the previously created ones. |
| Nesting level | Y | Node nesting level. This field is populated automatically. This parameter shows on which nesting level this item is located. |
| Parent | N | Specify a parent item if you need to implement a structure with some nesting levels. |
This tab appears if the used node type has the RE model specified, and the Need URL attribute of the node type is enabled.
| Field | Mandatory | Description |
|---|---|---|
| URL | Y | Specify a URL for an item. In this field, you can specify either absolute or relative URL (relative to the current portal referring to the tree to which the current node is assigned):
|
When a node is created, you can create child nodes for it. You can do this right from its record form by completing the steps:
- In the Related Lists area, select Child Nodes tab.
- Click New and fill in the fields as described above.
- Click Save or Save and exit to apply the changes.