Create a Project
To create a new project, complete the following steps:
- Navigate to SDLC → Projects → New Project or to SDLC → Projects → All Projects / My Projects and click New.
- Follow the tips on the pages.
- Click Create project when all steps are completed.
Step 1. General
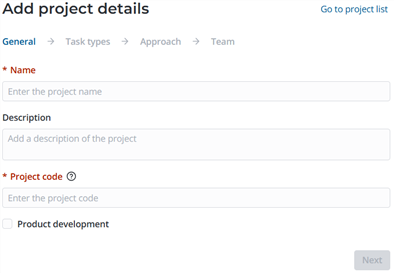
-
Enter the project Name.
-
(optional) Add the project Description.
-
Enter the Project code.
noteThe project code is added to all of the project tasks numbers. The code must be unique and consist of 2-8 Latin letters or numbers.
-
(optional) Select the Product development checkbox to connect the project to a product. This will reveal additional fields on the page, and the field Added to the project will become editable.
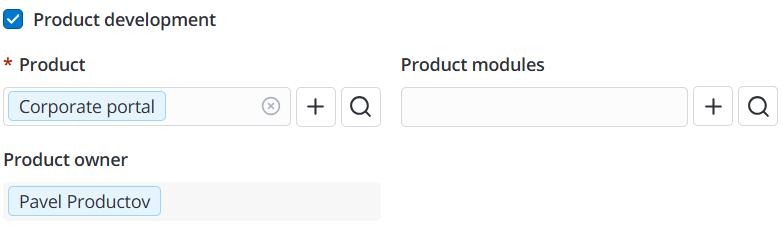
- Click the magnifier icon to select an existing product or the plus icon , to create a new one.
- After specifying the product, you will see the Product owner module completed with the employee who owes the product. The field is read-only.
- Add the product modules related to the project.
-
Click Next to proceed to the next step.
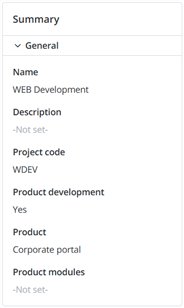
noteUse the Summary panel on the right of the widget to see the added data.
Click an area with a step title to expand it or hide it.
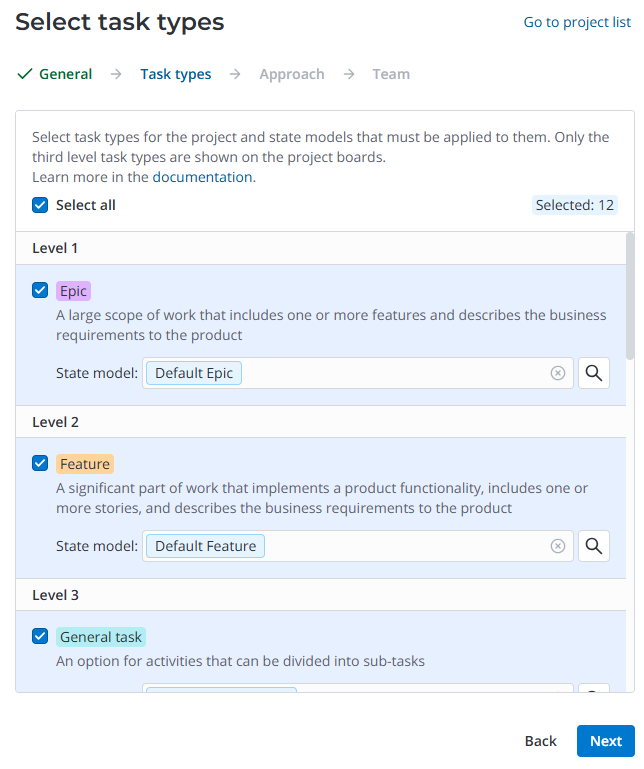
Step 2. Task types
-
Select the first, second, and third level task types to be used in the project. Click Select all to select or clear the checkboxes next to all available task types. Note that:
- At least one task type must be added to the project to continue.
- If no third-level task type is added to the project, the task board does not work correctly.
- The list of added task types can be modified after the creation of the project.
-
Specify a state model to apply to each task type in the project. Note that:
- For each task type, the State model specified on its form is selected by default, if states have been overridden for the task type, or the state model of the parent task table (SDLC Task (pda_backlog_item) or Task (task)). If they have not been overridden, the parent table state model is selected by default. If there is no state model specified on the task type form and only one state model suits the task type, the field is completed with it. If there is more than one such state model, the field is empty by default. In this case, you need to specify the state model manually.
- If you clear the state model for a task type in a project and do not specify another value, all state transitions will be allowed for this task type on the project board.
-
Click Next to proceed to the next step. For all selected task types in which state model is specified, the State Models in Project records will be created after the creation of the project.
If you need to change the previously added data, click Back to return to the previous step. The data added on this step will be preserved.
Step 3. Approach
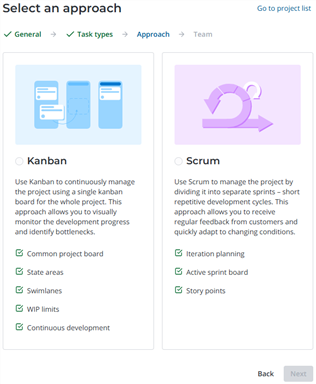
- Click one of the cards to select an approach to the project development: Kanban or Scrum.
- If you select Scrum, specify the Sprint duration, days.
- Click Next to proceed to the next step.
If you need to change the previously added data, click Back to return to the previous step. The data added on this step will be preserved.
Step 4. Team
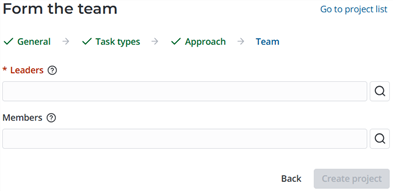
- Specify at least one Leader of the project and optional Members of the project. The selected employees will have access to the project task board and task creation. You can only specify active employees with the pda_admin or pda_user roles. The same employees cannot be selected as both the leader and member of the team. By default, the current user is specified as the leader.
- Click Create project.
If you need to change the previously added data, click Back to return to the previous step. The data added on this step will be preserved.
You will see a modal window with an option to proceed to the project form after a successful project creation.
The task board is added automatically for each project. The boards vary depending on the selected approach to the development. Click Open board in the right upper corner of the project form to proceed to the task board.
Project form
To see the list of projects, navigate to SDLC → Projects → All Projects or My Projects.
Project form fields
- General
- Additional
| Field | Mandatory | Description |
|---|---|---|
| Name | Y | Specify the project title. |
| Project code | Y | Specify the project code that will be added to the task titles as an in informative prefix for you to quickly identify the project tasks. The project code must be unique and consist of 2–8 Latin letters or numbers. |
| Approach | Y | The approach to the development used on the project. Possible values:
The field is filled in automatically during the project creation and is read-only. |
| Sprint duration, days | Y | Specify the default duration of a sprint in calendar days. You can change this value when you launch future sprints. The field appears only if Scrum approach is used on the project. |
| Product development | N | Select the checkbox to connect the project to a product. |
| Product | Y | Specify the product to which the project is dedicated. The field appears only if the Product development checkbox is selected. If you change or clear the value of the current field, the Product modules field will be cleared. |
| Product modules | N | Specify the product modules to be developed in the course of the project. You can only select the modules related to the specified Product. If the Product field is empty, the product will be specified automatically after you specify a module. |
| Product owner | N | The field is filled in automatically with the value of the corresponding field from the selected Product record and is read-only. |
| Description | N | Add the project description. |
| Field | Mandatory | Description |
|---|---|---|
| Task types | Y | Specify the task types available in the project. At least one task types must be added to the project. If no third-level task type is added to the project, the task board does not work correctly. If there are custom task types, they will also be available for selection. Possible default options:
|
| Active | N | The checkbox is selected by default. Clear it to deactivate the project. |
| Team capacity, SP | N | The field is filled in automatically. The team capacity is calculated as the sum of project members capacities. The capacity shows the number of story points that can be completed by the team in one sprint. The field is available only for Scrum projects. |
| Git repositories | N | Specify the Git repositories related to the project. |
Click Open Board to open the project task board in a new tab.
Related lists
-
SDLC Tasks – the list of tasks related to the project in all states. Click Create task to open the task creation modal window and add a new record without leaving the current form. You can select from the task types of the first, second, and third levels that are added to the project. The Project field will be pre-filled with the current record. If Product is specified on the project form, it will be pre-filled as well. You can select from the states for which columns are active and the states preceeding the state of the leftmost active column of the project board. After the creation, the task is added to the corresponding column if it is active on the board. The action is available to users with the admin, pda_admin roles; or a user with the pda_user role, if they are:
- a project team member or leader;
- the owner of the project product or product module.
-
Project Members – the list of project members and their roles.
-
Sprints – the list of sprints created for the project. The list is only displayed for Scrum projects.
-
Task Dependencies – the list of dependencies created for the tasks related to the project.
-
State Models – the list of state models applied to task types in the project.